- Seahorse XF DMEM assay medium, pH 7.4 or Seahorse XF RPMI assay medium, pH 7.4
- Seahorse XF Glucose (1.0 M solution)
- Seahorse XF Pyruvate (100 mM solution)
- Seahorse XF Glutamine (200 mM solution)

Determining the optimal miniplate for your XF HS Mini assay
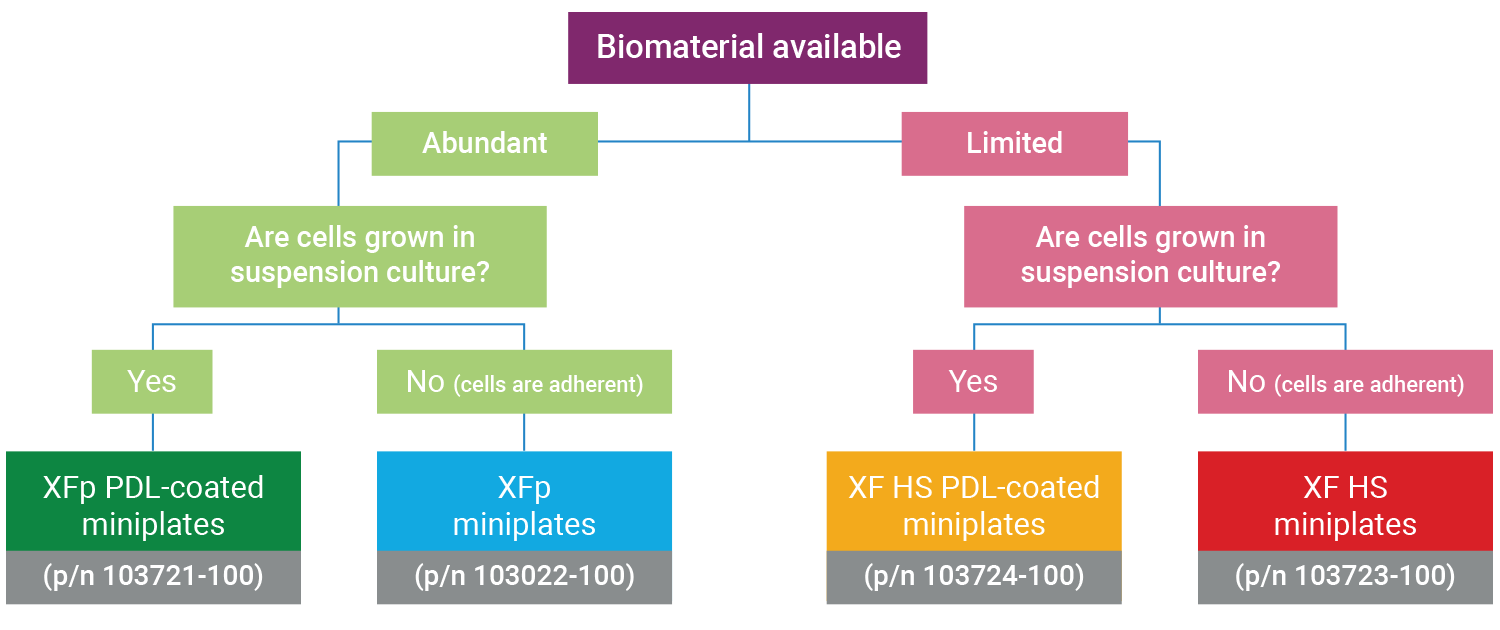
The XF HS Mini Analyzer is compatible with all Seahorse XFp kits, reagents, cell culture plates, and FluxPaks.
Related Support Material
- Training Webinar: Gather Assay Materials
- Seahorse XF Sensor Cartridges and Tissue Culture Microplates
- Seahorse XF Assay Kits and Reagents
- Consumables Guide
- Consumables Guide
- Consumables Guide
- Consumables Guide
- Consumables Guide
- Consumables Guide
- Seahorse XF Media and Buffer Selection Guide
- Preparation of XF Assay Media
- Preparation of XF Assay Media
- Cell Characterization: The XFe96/XF96 Analyzer and the Seahorse XF Real-Time ATP rate assay
- Cell Characterization: The XFe24 Analyzer and the Seahorse XF Real-Time ATP rate assay
- Cell Characterization: The XFp Analyzer and the Seahorse XFp Real-Time ATP rate assay
- Cell Characterization: The XF HS Mini Analyzer and the XF Real‐Time ATP Rate Assay
- Cell Characterization: The XF HS Mini Analyzer with the HS Miniplate and the XF Real-Time ATP Rate Assay
Reference Material
- Agilent Seahorse Assay Guides and Templates
- Agilent Seahorse Assay Guides and Templates
- Agilent Seahorse Assay Guides and Templates
- Agilent Seahorse Assay Guides and Templates
- Agilent Seahorse Assay Guides and Templates
- Agilent Seahorse Templates
- Agilent Cell Analysis Publication Database
Browse the full list of publications using Agilent Cell Analysis data.
1.2 Other Required Materials Provided by the User
Other Required Materials
- 37 °C non-CO2 incubator
- Cell counter/Hemacytometer
- 37 °C water bath
- Distilled or Sterile H2O
- Inverted Brightfield Microscope
- Touch vortex
- 15 and 50 mL conical tubes
- P200, P1000, 8 and/or 12 channel P200 pipettes
- P200, P1000, 8 channel P200 pipettes
- Reagent Reservoirs
Recommended Materials
- Centrifuge with adaptors for cell culture plates (required if using suspension cell types)
- Microcentrifuge
- Calibrated pH meter*
- Stir plate*
- Sterile filter bottles (0.22 μm filter) and cap*
- 1.0 N NaOH solution*
(* these items are required if using assay media other than Seahorse XF DMEM pH 7.4 or Seahorse XF RPMI pH 7.4)
Related Support Material
- Training Webinar: Gather Assay Materials
- Seahorse XF Sensor Cartridges and Tissue Culture Microplates
- Seahorse XF Assay Kits and Reagents
- Consumables Guide
- Consumables Guide
- Consumables Guide
- Consumables Guide
- Seahorse XF HS Mini Consumables Ordering Guide
- Seahorse XF Media and Buffer Selection Guide
- Preparation of XF Assay Media
- Preparation of XF Assay Media
- Cell Characterization: The XFe96/XF96 Analyzer and the Seahorse XF Real-Time ATP rate assay
- Cell Characterization: The XFe24 Analyzer and the Seahorse XF Real-Time ATP rate assay
- Cell Characterization: The XFp Analyzer and the Seahorse XFp Real-Time ATP rate assay
- Cell Characterization: The XF HS Mini Analyzer and the XF Real‐Time ATP Rate Assay
- Cell Characterization: The XF HS Mini Analyzer with the HS Miniplate and the XF Real-Time ATP Rate Assay
Reference Material
- Agilent Seahorse Assay Guides and Templates
- Agilent Seahorse Assay Guides and Templates
- Agilent Seahorse Assay Guides and Templates
- Agilent Seahorse Assay Guides and Templates
- Agilent Seahorse Assay Guides and Templates
- Agilent Seahorse Templates
- Agilent Cell Analysis Publication Database
Browse the full list of publications using Agilent Cell Analysis data.
Showing only information for the Seahorse
2. Prepare for Your XF Assay
This section focuses on preparation techniques the day before an XF assay, including guidance for choosing cell seeding densities, techniques for seeding adherent cells on XF tissue culture plates and hydrating XF cartridges.
This section focuses on preparation techniques the day before an assay, including guidance for choosing cell seeding densities, techniques for seeding adherent cells on XFp tissue culture plates and hydrating XFp cartridges.
This section focuses on preparation techniques the day before an assay, including guidance for choosing cell seeding densities, techniques for seeding adherent cells on XFp miniplates, XF HS miniplates, or XF HS PDL miniplates and hydrating an 8-well sensor cartridge.
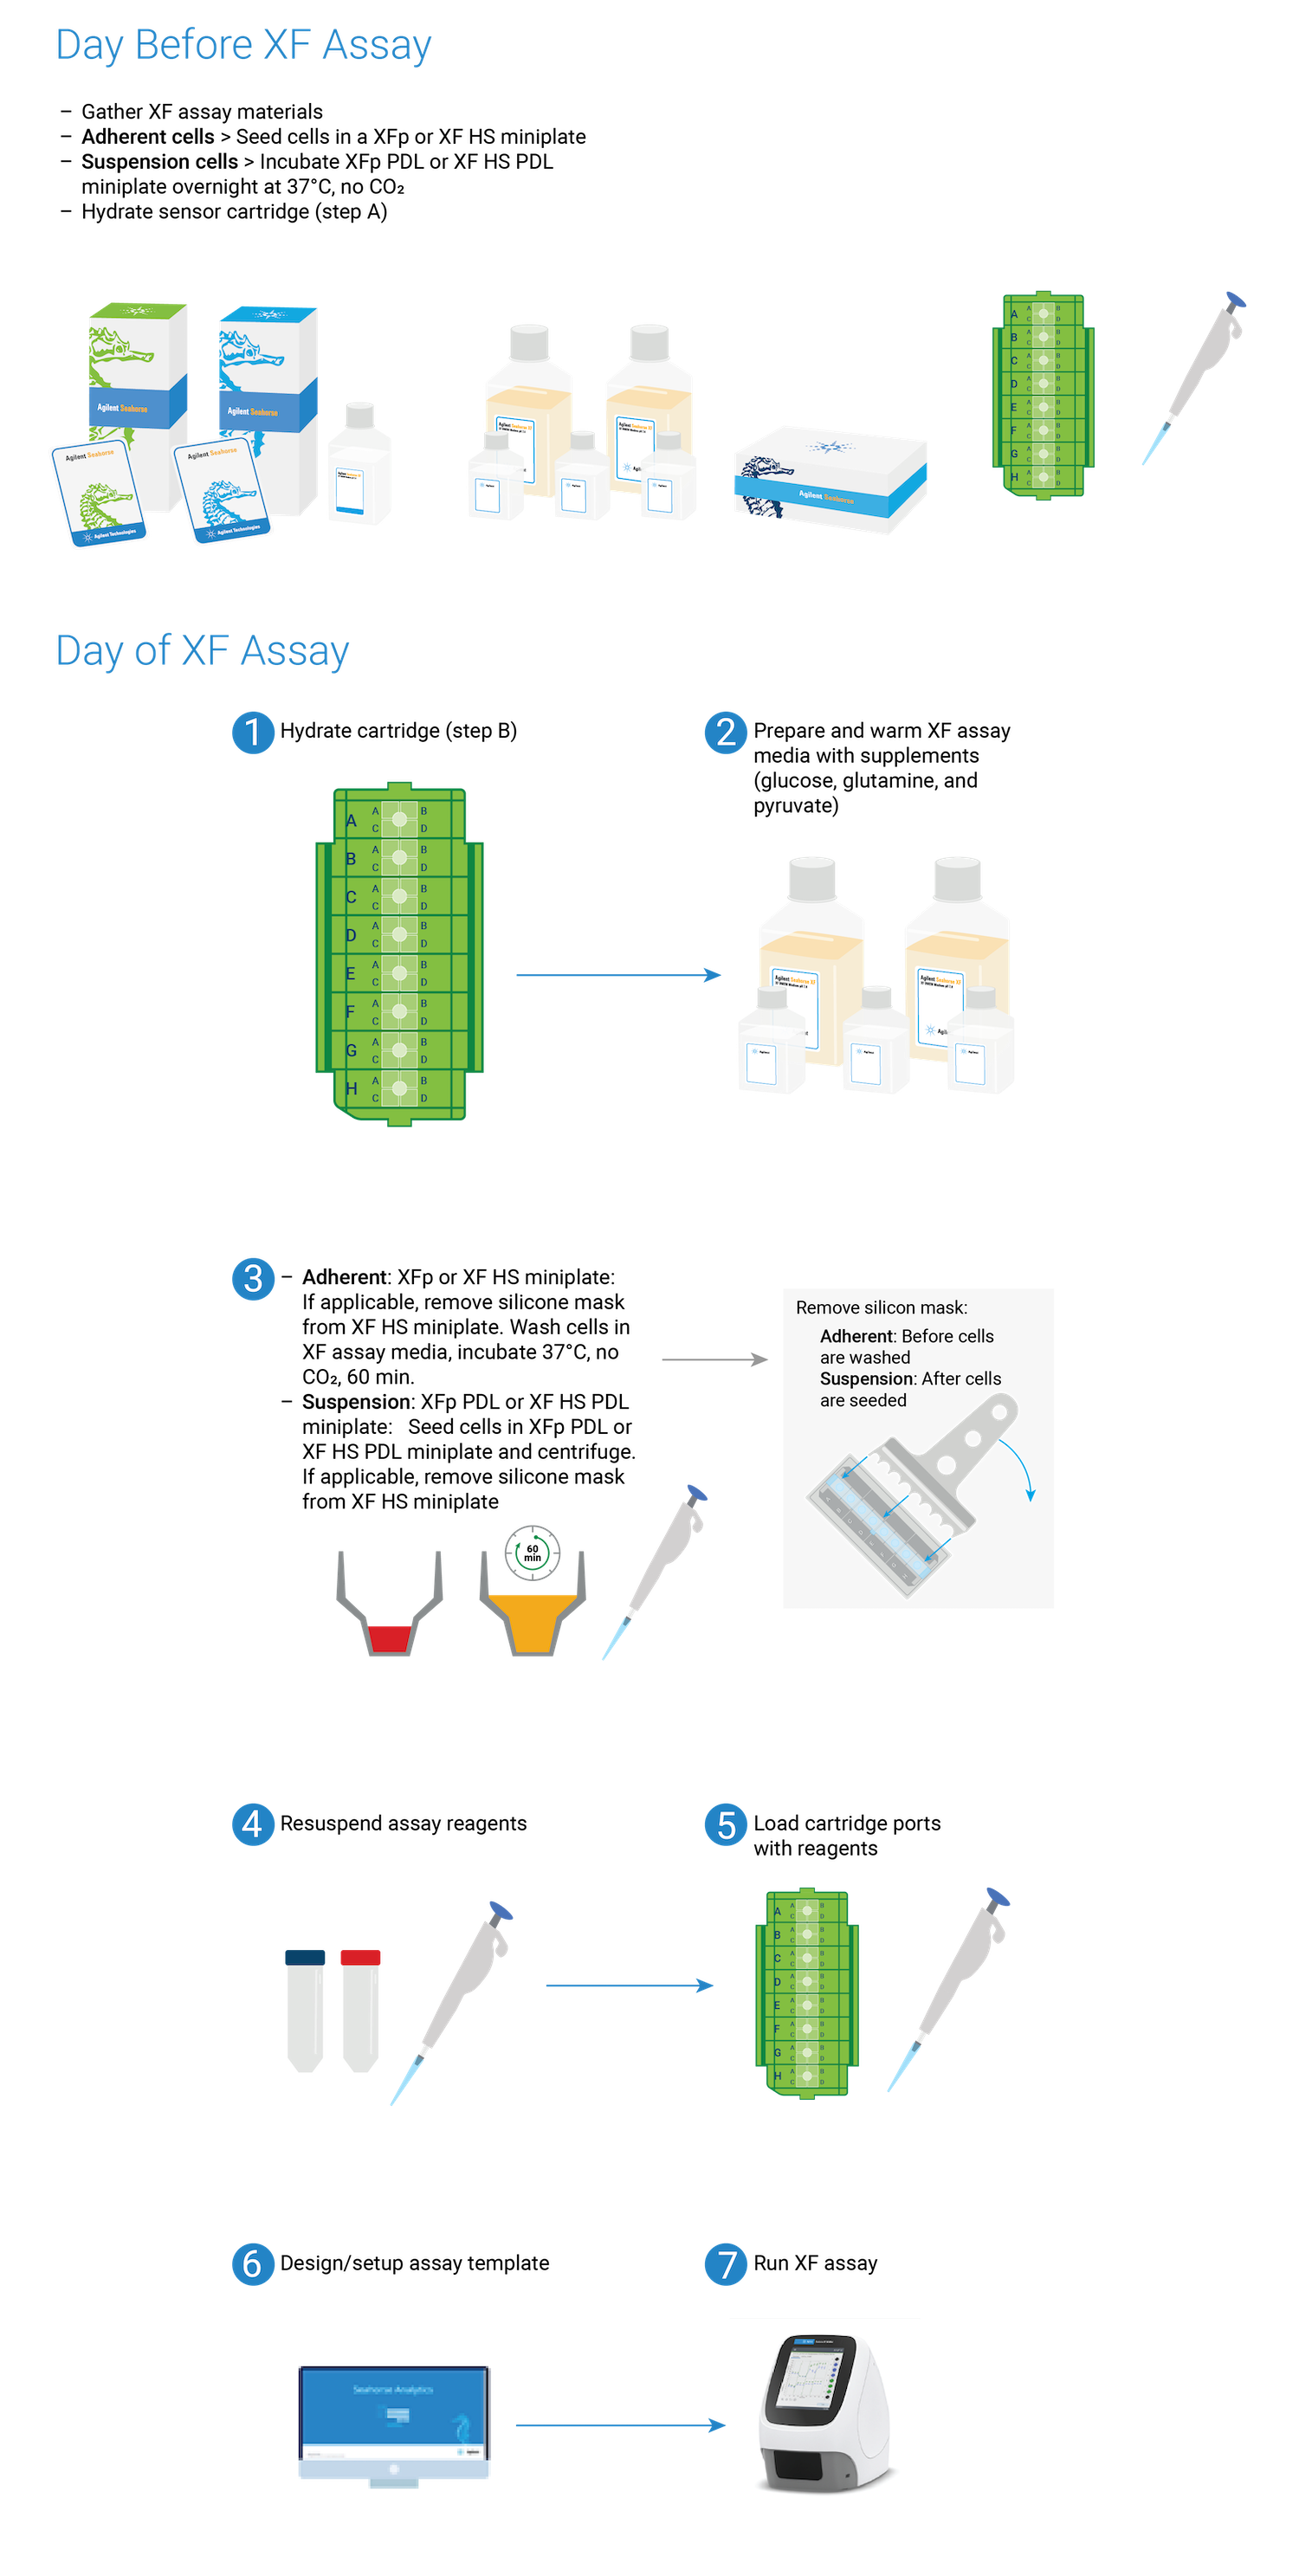
Note: See workflow diagram for an overview of the steps involved in running an XF HS Mini assay.
Select a workflow step to display help content.
Overview of performing an assay with XFp or XF HS miniplates.
2.1 Choose Cell Seeding Densities
Basic procedures for choosing cell seeding densities
To effectively examine metabolic and bioenergetic function using your Agilent Seahorse Extracellular Flux Analyzer, Analyzer, it is essential to first characterize a specific cell type with respect to its metabolic activity under basal and maximal respiration (OCR) and extracellular acidification (ECAR). The Seahorse XF Real-Time ATP rate assay Test Kit The Seahorse XFp Real-Time ATP rate assay Test Kit can be used to characterize the cell line/type of interest in a single assay. two short assays.
Optimal cell seeding number varies by cell type, but is typically between 5 x 10 3 and 4 x 10 4 cells per well for adherent cells. Suspension cells require higher seeding density from 5 x 10 4 to 2 x 10 5 cells per well depending on cell type. 1 x 10 4 and 8 x 10 4 cells per well. Generally, densities resulting in 50-90% confluency generate metabolic rates in the desirable/dynamic range of the instrument.
Optimal cell seeding number varies by cell type and plate type. Generally, densities resulting in 50–90% confluency generate metabolic rates in the desirable/dynamic range of the instrument. See table for further details.
For XF HS miniplates and XF HS PDL miniplates, optimal cell seeding number is typically between 1.0 × 10 3 and 1.0 × 10 4 cells per well for adherent cells. Suspension cells require higher seeding density from 2.0 x 10 4 and 7.0 x 10 4 cells per well depending on the cell type.
For XFp miniplates and XFp PDL miniplates, optimal cell seeding number is typically between 5 x 10 3 and 4 x 10 4 cells per well for adherent cells. Suspension cells require higher seeding density from 5 x 10 4 to 2 x 10 5 cells per well depending on cell type.
Please consult the Agilent Cell Analysis Publication Database to provide an initial starting point for cell density values specific to your needs.

| Plate type | Optimal cell seeding number (cells/well) | |
|---|---|---|
| adherent cells | suspension cells | |
| XF HS miniplates / XF HS PDL miniplates | 1.0 × 10 3 – 1.0 × 10 4 | 2.0 × 10 4 – 7.0 × 10 4 |
| XFp miniplates / XFp PDL miniplates | 5 × 10 3 – 4 × 10 4 | 5 × 10 4 – 2 × 10 5 |
Basic procedures for choosing cell seeding densities
To effectively examine metabolic and bioenergetic function using your Agilent Seahorse Extracellular Flux Analyzer, it is essential to first characterize a specific cell type with respect to its metabolic activity under basal and maximal respiration (OCR) and extracellular acidification (ECAR). The Seahorse Cell Energy Phenotype Test Kit can be used to characterize the cell line/type of interest in two short assays
Optimal cell seeding number varies by cell type, but is typically between 1 x 10 4 and 8 x 10 4 cells per well. Generally, densities resulting in 50-90% confluency generate metabolic rates in the desirable/dynamic range of the instrument.
Please consult the Agilent Cell Analysis Publication Database to provide an initial starting point for cell density values specific to your needs.
Related Support Material
- Prepare for your XF Assay
- Knowing your cells of Interest: Advice and Suggestions for a Successful XF Experience
- Browse the full list of publications using Agilent Cell Analysis data.
2.2 Hydrate Cartridge
Basic procedures for hydrating the 8-well sensor cartridge
Note: XFp sensor cartridges are compatible with the XF HS Mini analyzer
An important component of the XF p HS Mini assay platform is the sensor cartridge. Each probe tip of the sensor cartridge is spotted with a solid-state sensor material that detects changes in both pH and O2 concentration over time to calculate rates. In order for the sensors to function correctly, they must be thoroughly hydrated.
The Day Prior to the XF p HS Mini assay:
- Aliquot at least 20 mL of XF Calibrant into a 50 mL conical tube. Place this in a non-CO2 37° C incubator overnight.
- Aliquot at least 5 mL of XF Calibrant into a 15 mL conical tube. Place this in a non-CO2 37° C incubator overnight.
- Open the Extracellular Flux Assay Kit, and remove the contents.
- Obtain a three-pack of cartridges from the green box. Remove the foil seal from the tub(s) that will be used.
- Place the sensor cartridge upside down next to the utility plate.
- Separate the utility plate and sensor cartridge, and place the sensor cartridge upside down next to the utility plate.
- Fill each well of the utility plate with 200 μL of sterile, tissue culture grade water.
- Fill the moats around the outside of the wells with 400 µL per chamber.
- Lower the sensor cartridge onto the utility plate, submerging the sensors in the water.
- Verify the water level is high enough to keep the sensors submerged.
- Place in a non-CO2 37 °C incubator overnight. To prevent evaporation of the water, verify that the incubator is properly humidified.
- The sensor cartridge hydration protocol continues in section 3.1 of the Learning Center, please continue reading
- Open the Agilent Seahorse Flux Assay Kit and remove the contents.
- Place the Sensor Cartridge upside down next to the Utility Plate.
- Fill each well of the Utility Plate with 1 mL of XF Calibrant.
- Place the Hydro Booster on top of the Utility Plate.
- Lower the Sensor Cartridge through the openings on the Hydro Booster plate, into the Utility Plate submerging the sensors in XF Calibrant.
- Lower the sensor cartridge onto the utility plate, submerging the sensors in the water.
- Verify the XF Calibrant level is high enough to keep the sensors submerged.
- Place in a non-CO2 37°C incubator overnight. To prevent evaporation of the XF Calibrant, the incubator should be humidified.
- IMPORTANT NOTE: The Hydro Booster must be removed prior to placing the Sensor Cartridge into the Agilent Seahorse Analyzer. Failure to do so may result in damage to both the Sensor Cartridge and the Analyzer. See Section 3 for further instructions.
Related Support Material
- How to Hydrate an Agilent Seahorse XFe96 Sensor Cartridge
- How to Hydrate an Agilent Seahorse XFe24 Sensor Cartridge
- How to Hydrate an Agilent Seahorse XF24 Sensor Cartridge
- How to Hydrate an Agilent Seahorse XFp Sensor Cartridge
- Cell Characterization: The XFe96/XF96 Analyzer and the Seahorse XF Real-Time ATP rate assay
- Cell Characterization: The XF24 Analyzer and the Cell Energy Phenotype Test
- Cell Characterization: The XFe24 Analyzer and the Seahorse XF Real-Time ATP rate assay
- Cell Characterization: The XFp Analyzer and the Seahorse XF Real-Time ATP rate assay
Reference Material
- Agilent Seahorse Assay Guides and Templates
- Agilent Seahorse Assay Guides and Templates
- Agilent Seahorse Assay Guides and Templates
- Agilent Seahorse Assay Guides and Templates
- Agilent Seahorse Assay Guides and Templates
- Agilent Seahorse Templates
- Agilent Cell Analysis Publication Database
Browse the full list of publications using Agilent Cell Analysis data.
2.3 Design Experiment
Wave Desktop Pro software allows you to easily create & customize assay template files to run on the Seahorse Analyzer.
What is an assay template file? Think of assay template files as an electronic copy of the experiment you designed in your lab notebook. The information entered in your assay template file is stored as a record of your experiment within the result file, which can be shared & re-run by you or other collaborators, provides structure & organization to your result data after assay completion, and offers valuable troubleshooting info when needed.
The 3 elements of an assay template file are:
- Group Definitions
- Plate Map
- Instrument Protocol
Group Definitions
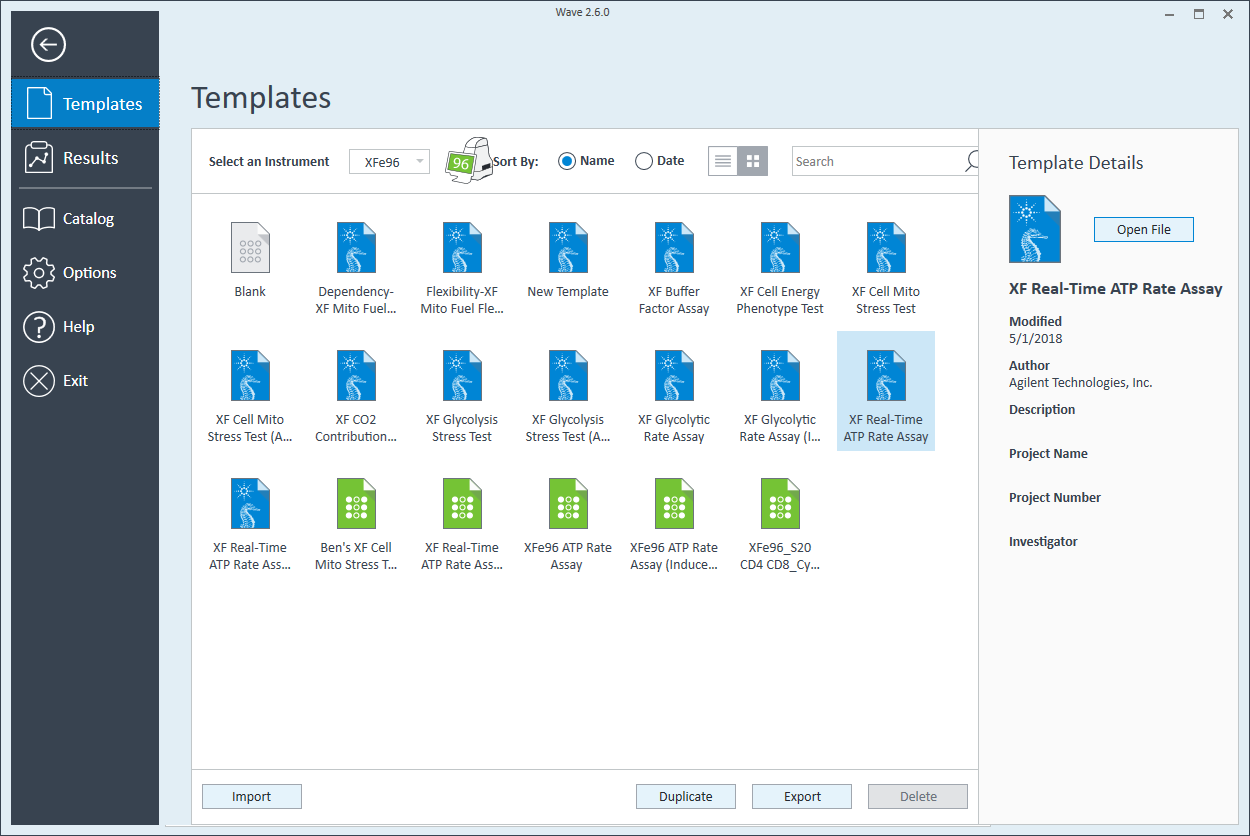
- Open Wave 2.6 Pro software
- Click Templates (located below Wave Home)
- Open the assay template called XF Real-Time ATP Rate Assay
- On the Group Definitions view, you will see prepopulated information for the injection strategy, pretreatments, assay media and cell type.
- Double-click Pretreatments and delete the Control & Experimental entries.
![]()
![]()
- Double-click Cell Type and delete the default entry called Cells (See Agilent Cell Analysis Publication Database).
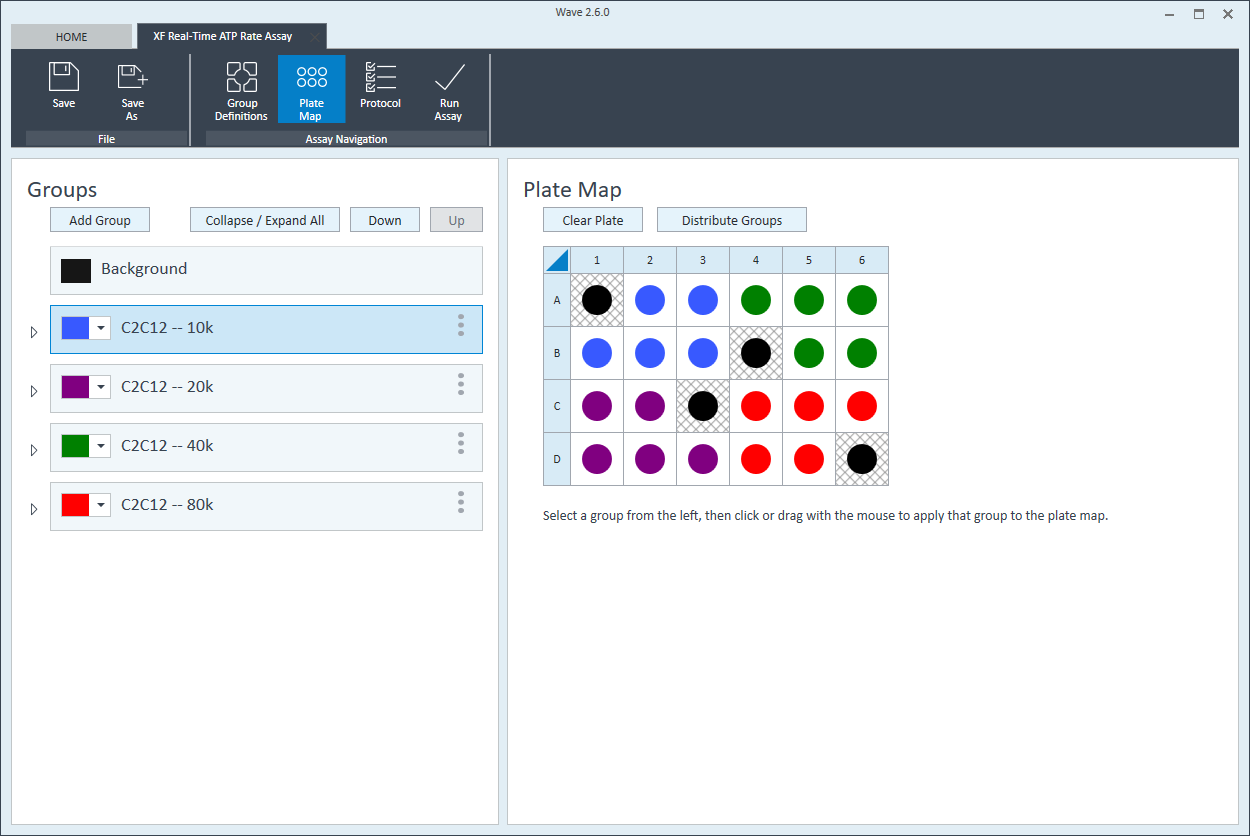
- Within the Cell Type group definition, click Cell Type and Add to add a new cell type entry and enter the name of cell type you intend to analyze in your assay. It is recommended to add the seeding density to group name. For example, the C2C12 Cell Type with a seeding density of 20,000 cells per well would be named: 20k C2C12
Repeat 3 times for each Cell Type definition.
- Create a new assay template for the 3rd and 4th cell seeding density groups.
- Add 4 cell seeding density groups to one assay template and reassign the 3rd and 4th cell group to the plate map after performing the first assay with cell seeding density groups 1 and 2.
- Rename groups in this template after performing the first assay with cell seeding density groups 1 and 2.
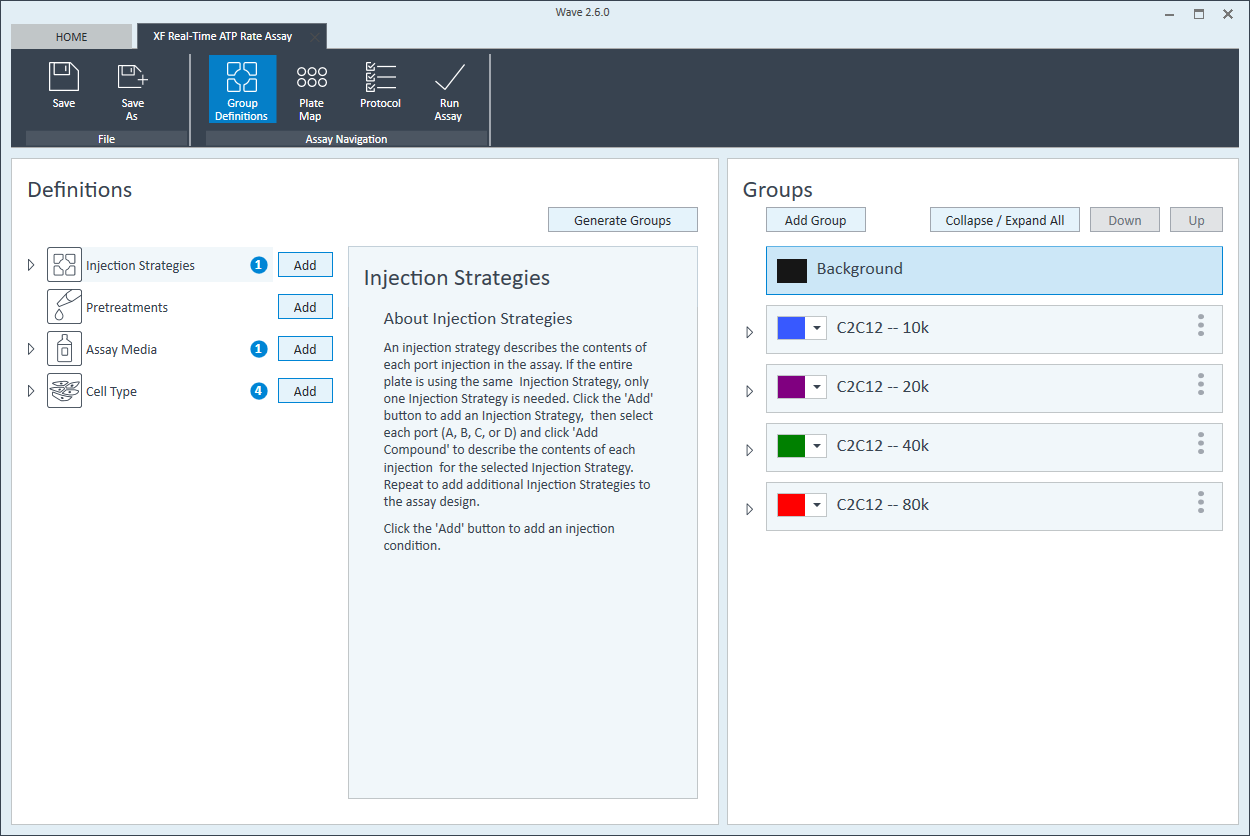
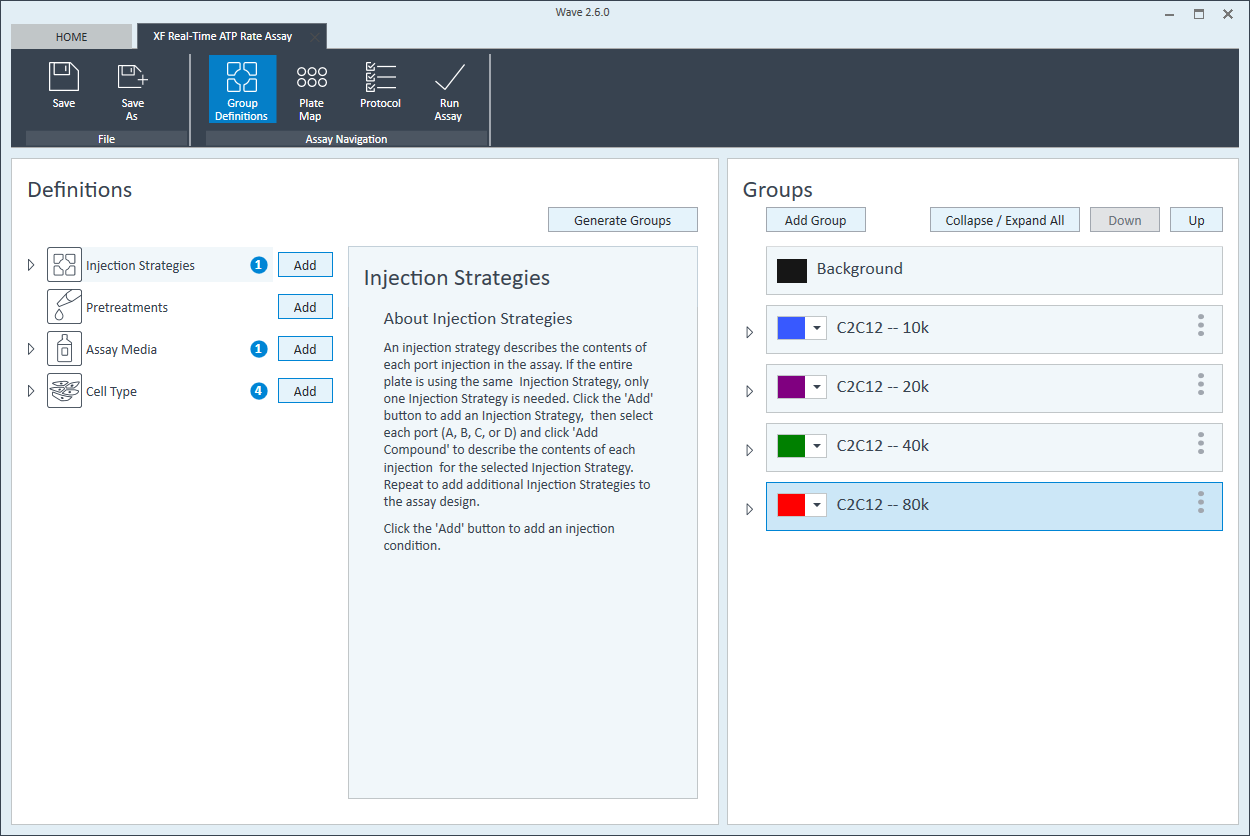
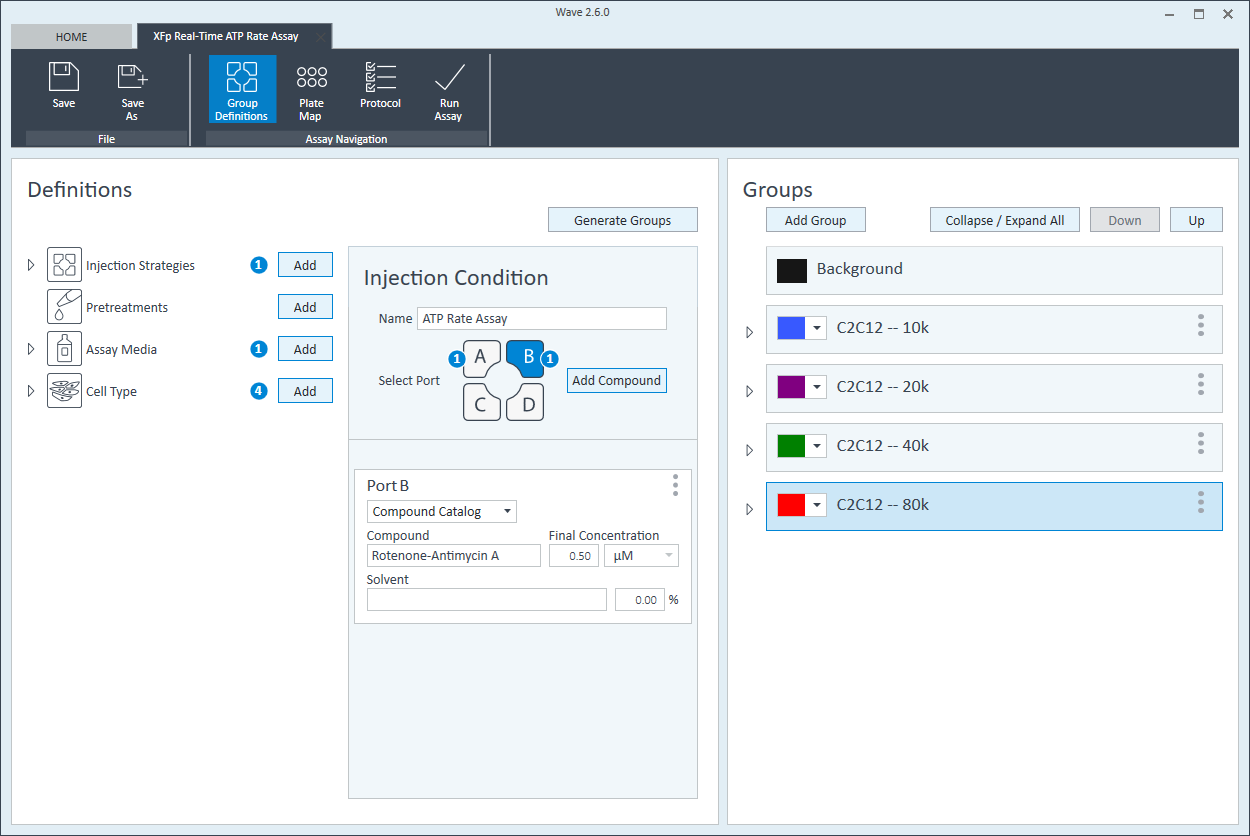
- Once finished naming your groups, click Generate Groups and Wave will automatically create your 4 unique assay groups. Notice the group name includes the cell type and seeding density for simplified plate map assignment.
The next step is to assign groups to the plate map.
Plate Map
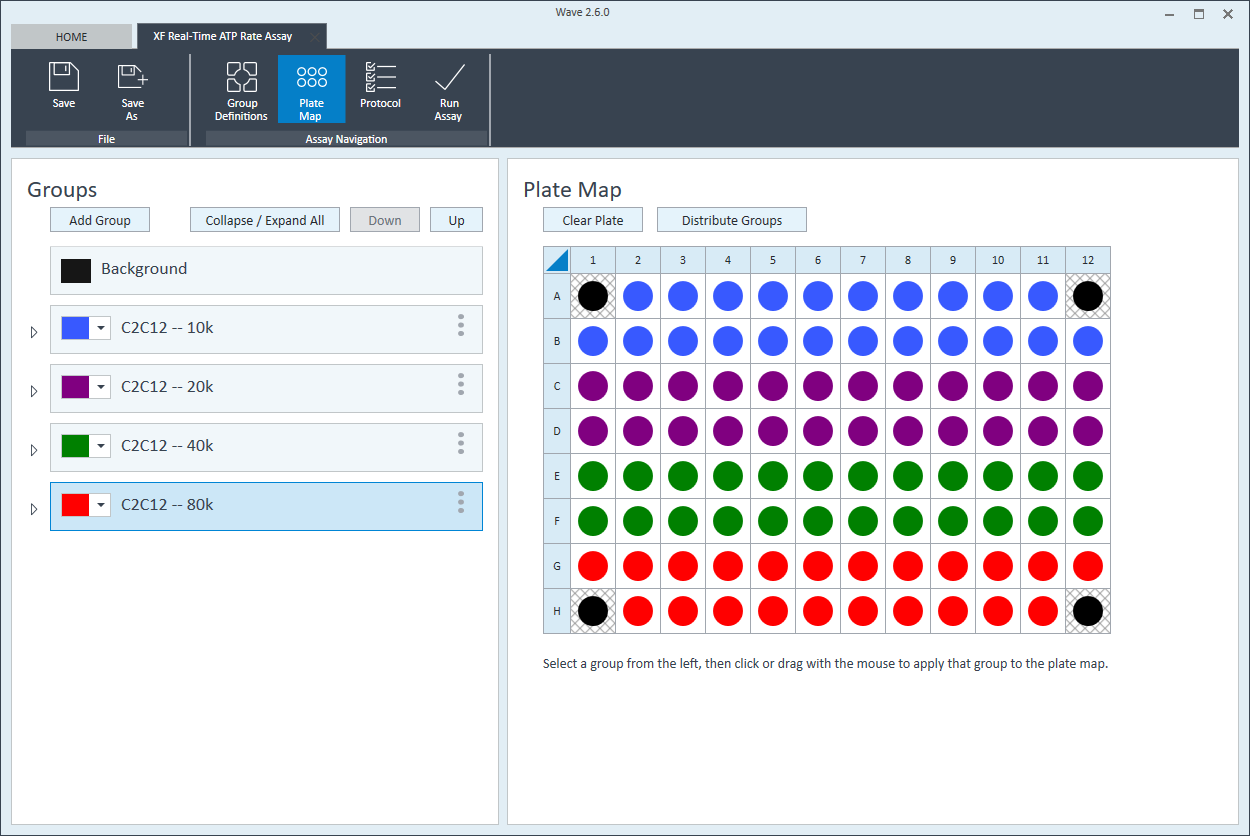
- Click Plate Map in the functions ribbon (under "Assay Navigation").
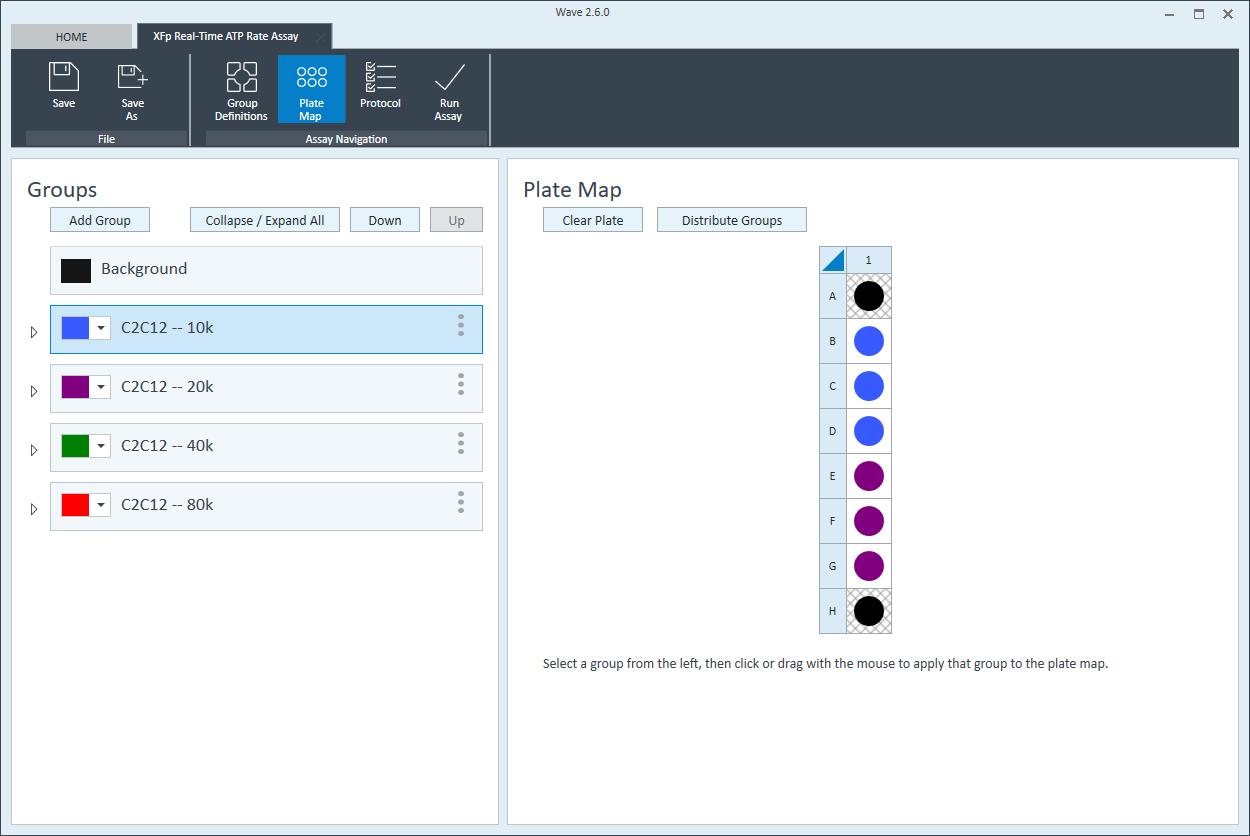
- Assign the first cell seeding density group to the plate map. To assign a group to the plate map, first click the group name in the group list, then:
- Click the column header (i.e. 1, 2, 3, etc.) or the row header (i.e. A, B, C, etc.)
- Drag & drop an area of wells on the plate map using your mouse left-click.
- Click individual wells on the plate map.
- Repeat for the next cell seeding density group. The suggested plate map layout is pictured above/below.

Instrument Protocol
- Click Instrument Protocol in the functions ribbon (under “Assay Navigation”) to view or edit the instrument protocol.
- Modifying the instrument protocol settings directly affects how data is acquired during your assay. For this example, the default instrument protocol is used (and recommended).
- Should you need to modify the default instrument protocol, prior to performing your cell seeding density optimization assay it is recommended to review the instrument protocol section in the Wave User Guide, or if necessary, contact Agilent Cell Analysis Technical Support.
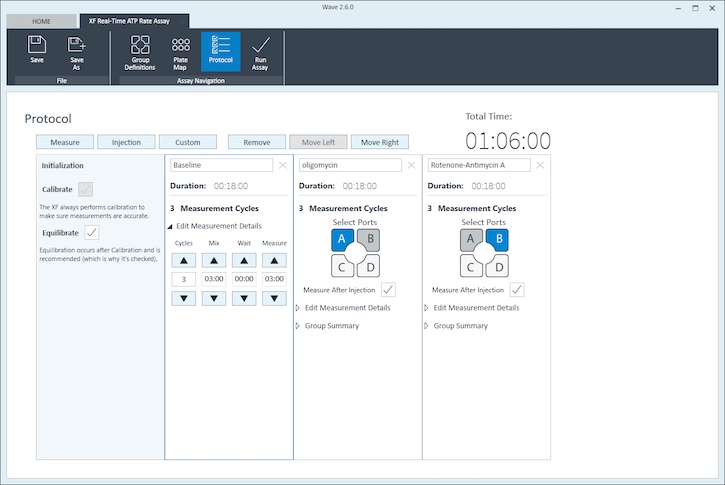
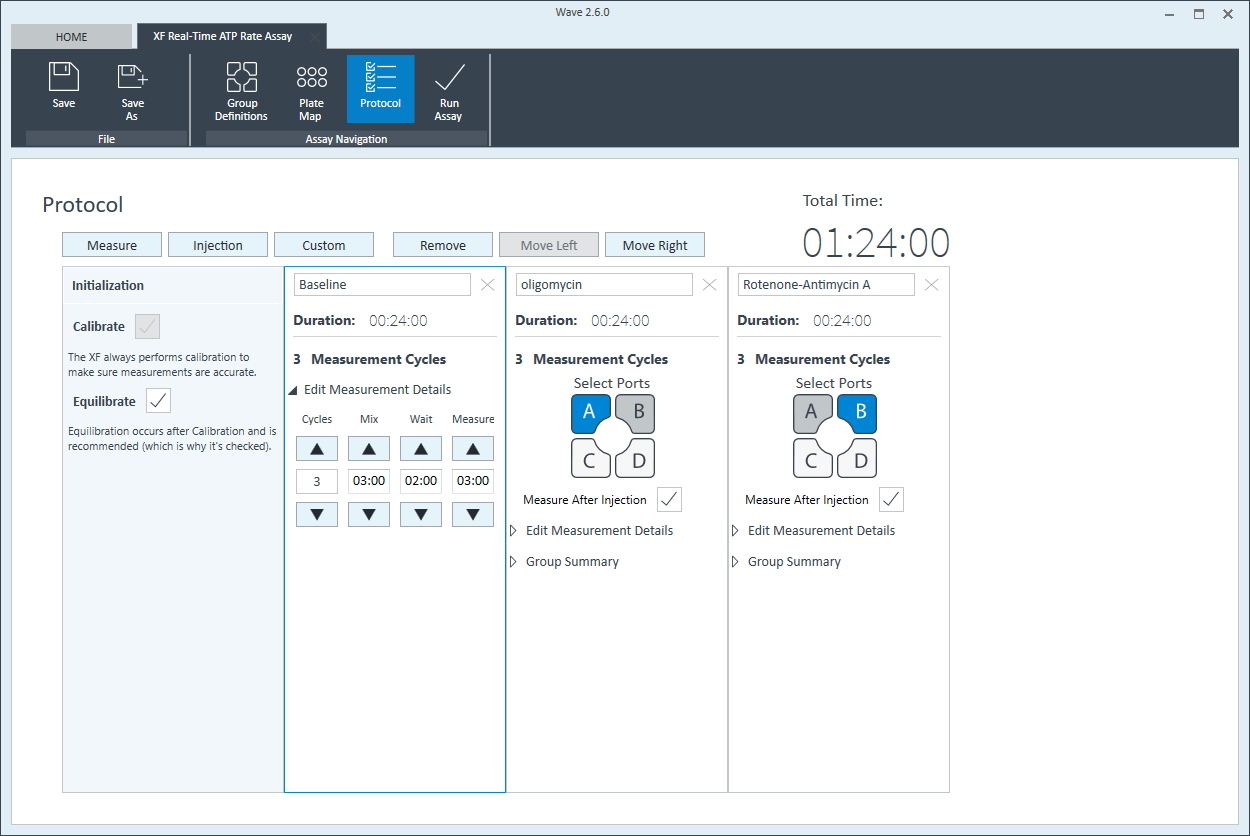
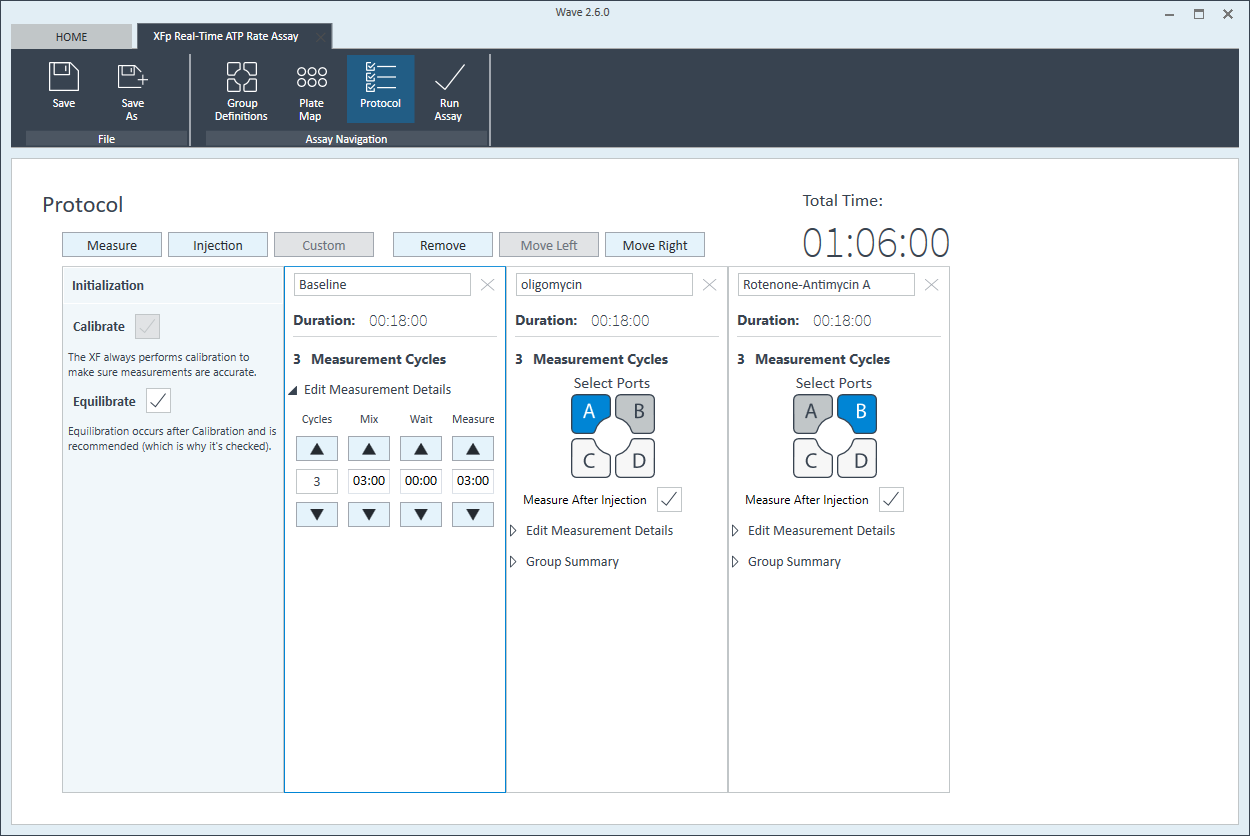
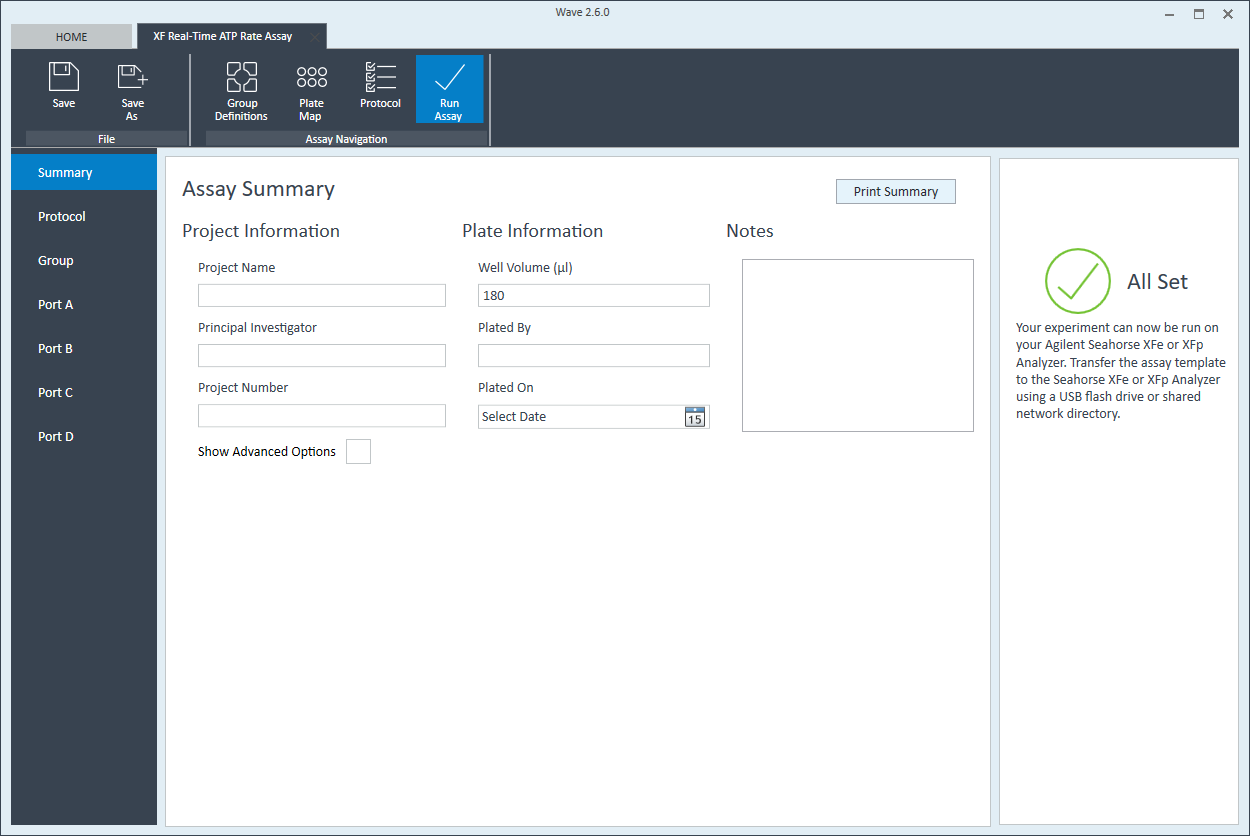
- Last, click Run Assay in the functions ribbon (under "Assay Navigation") to add additional experimental details, save the template file, and start the cell seeding density optimization assay.
- Click Run Assay in the functions ribbon (under "Assay Navigation") to add additional experimental details and save the template file.
- Transfer the assay template file to the XFp Analyzer following steps outlined in the XFp Extracellular Flux User Guide to perform the first cell seeding density optimization assay.
- Transfer the assay template file to the XF HS Mini Analyzer following steps outlined in the XF HS Mini Extracellular Flux User Guide to perform the first cell seeding density optimization assay.
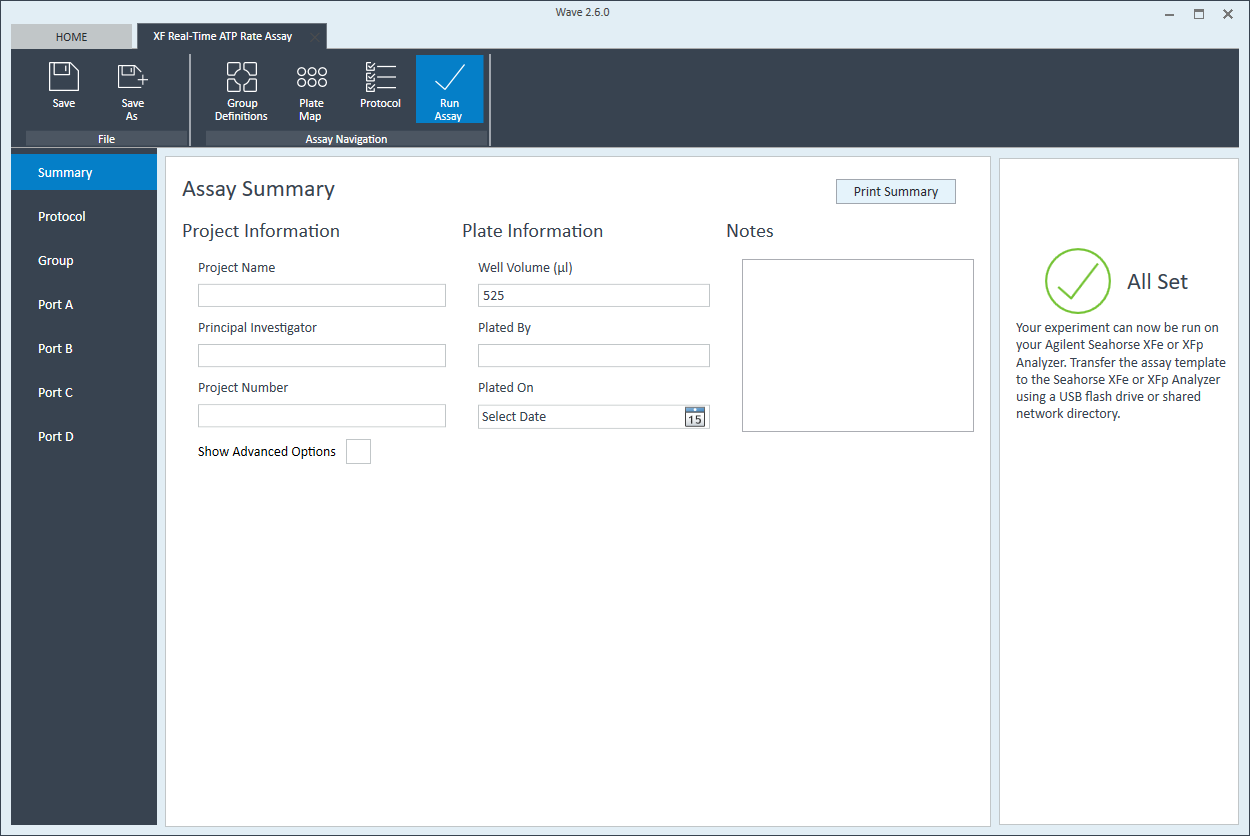
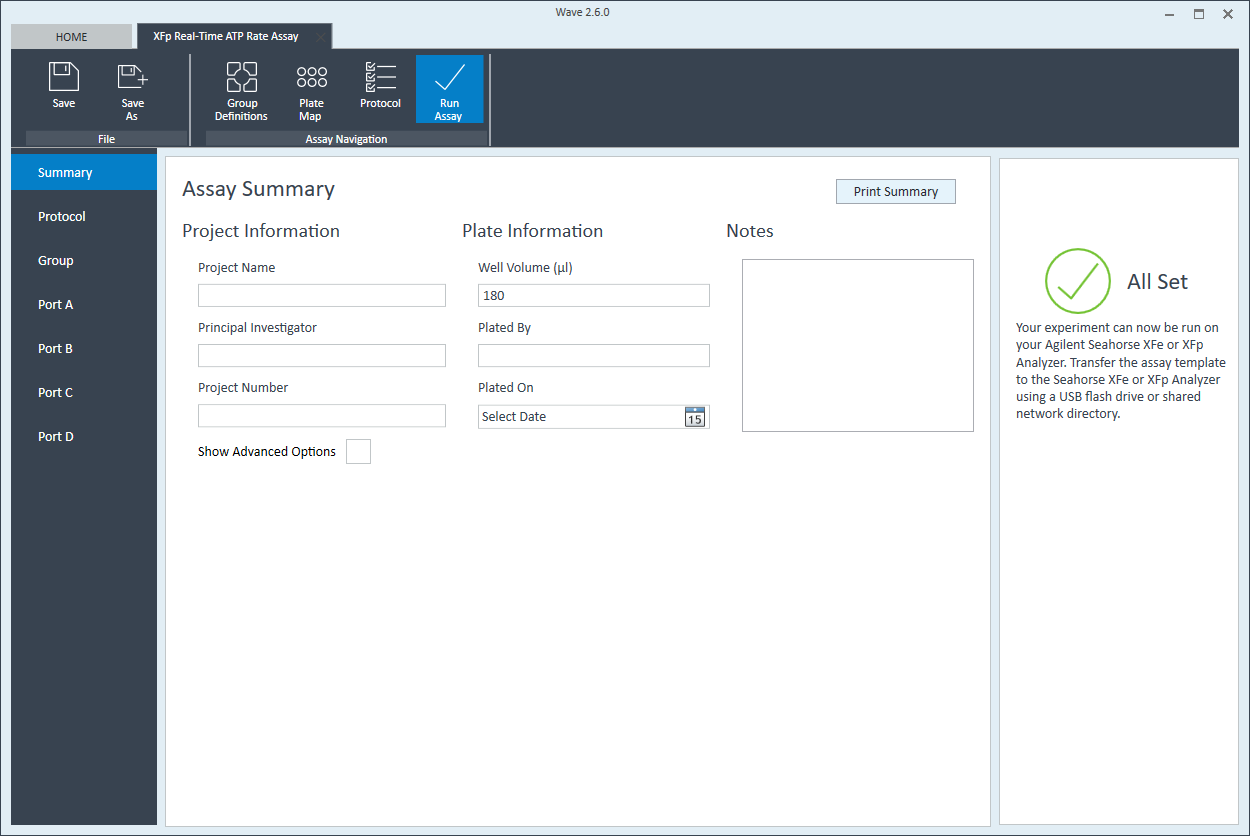 XFp review and run" />
Related Support Material
- Wave User Guide
- Wave Read Me
- Wave Release Notes
- XF Software & Computer Specifications
- XF Software & Computer Specifications
- Agilent Seahorse XF Real Time ATP Rate Assay Templates
- How to analyze Agilent XF Real-Time ATP Rate Assay result data
- Agilent Seahorse XF HS Mini Templates
- Seahorse XF HS Mini Software Update (February 2021)
2.4 Seeding Cells
2.3 Seeding Cells
Basic procedures for seeding adherent cells (typically performed the day before the XF p HS Mini assay)
For each density to be tested, seed as directed for adherent cells. View instructions for seeding suspension cells.
Agilent Seahorse XF p HS Mini Assays are performed in an Agilent Seahorse 96-well 24-well 8-well XF p Cell Culture Microplate Cell Culture Miniplate p, XF HS, XFp PDL, or XF HS PDL miniplates in conjunction with an Sensor Cartridge. XFe96 Sensor Cartridge. 8-well sensor cartridge. This procedure describes recommendations for seeding adherent cell types for use with the Agilent Seahorse Analyzer. View instructions for seeding suspension cells.
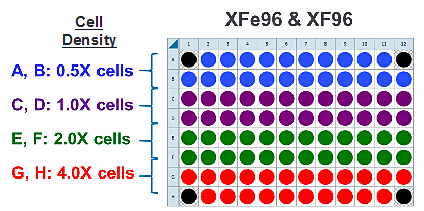
A method for four different cell densities using an XF96 cell culture plate, XFe96 cartridge and the Seahorse XF Real-Time ATP rate assay kit with an instrument is recommended for an initial assay.
A method for testing four different cell densities and four different FCCP concentrations using two cell culture plates, two cartridges and the XF Cell Energy Phenotype Test Kit with an instrument is recommended for initial assays.
A method for testing four different cell densities using an XF24 Cell Culture Microplate, XFe24 sensor cartridge and the Seahorse XF Real-Time ATP rate assay kit with an instrument is recommended for initial assays.
A method for testing 2-4 different cell densities using an XFp Cell Culture Miniplate, XFp 8-well sensor cartridge and the Seahorse XF Real-Time ATP rate assay kit with an XFp instrument XF HS Mini Analyzer are recommended for initial assays.
This is a suggested XF96 assay plate map for seeding four cell densities:
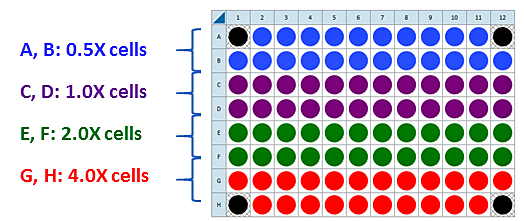
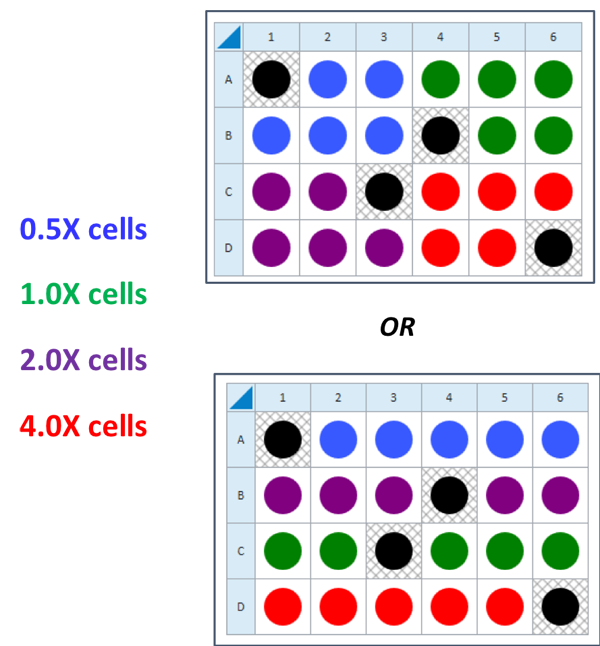
Seeding for Cell Density Titration Assay
This is a suggested assay plate map for seeding four cell densities:
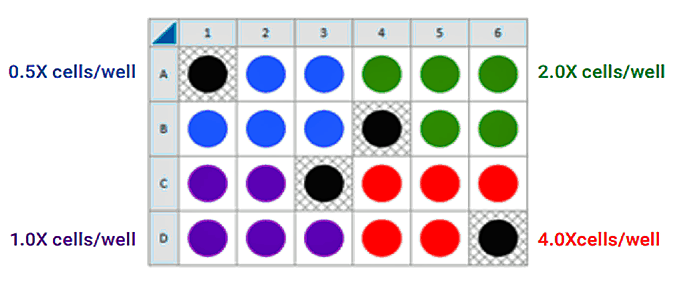
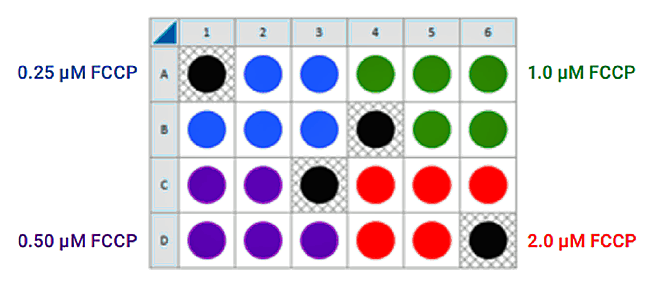
Seeding for FCCP Concentration Titration Assay
If you have already performed the cell seeding density assay and/or know the optimal number of cells per well, the FCCP titration assay may be performed using the optimal cell number (1.0 X cells/well) seeded in all wells except Background Correction wells. Otherwise, follow the same instructions for cell seeding and cartridge hydration/preparation as shown below, and use the following suggested plate layout for testing four concentrations of FCCP:
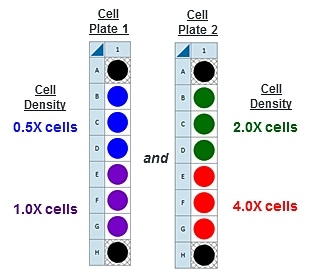
There are two workflow options: (1) For cells that are NOT limited in number, multiple XFp cell culture miniplates can be seeded at different densities to reduce the time between experiments and complete the characterization workflow more quickly (Accelerated Workflow). (2) For cells limited in number, additional cells are prepared after the results of the first experiment are determined (Standard Workflow). Depending on observed cell density and calculated basal rates more or fewer cells will be required for the next cell number optimization assay.
| Experiment | Rationale | Accelerated Workflow | Standard Workflow |
|---|---|---|---|
| Seed cells at single or different densities and visually assess degree of cell confluence; choose a miniplate for the next step. | To generate metabolic rates within the dynamic range of the instrument, cells should be 50-90% confluent. Visual assessment is a good first approximation of optimal cell density and will be verified in each assay. | Seed 1-2 miniplates at 2-4 different densities according to the diagram below. | Seed 1 miniplate at a single cell density; hydrate 1 XFp cartridge. |

2.4.1 XFp miniplates
- Choose 2-4 cell densities to test, based on standard or accelerated workflow described above. Either cover the range found in the references above, or seed the recommended cells/well value (1X) plus 0.5X, 2X and 4X cells per well.
- Remove a three-pack of miniplates from the blue box.
- Remove the foil seal from the tub(s) that will be used.
- Add sterile water or PBS to the moat around the cell culture wells. Use an 8-channel pipettor set to 200 μL, and fill both sides of the moat (two tips will fit into each chamber). If no multi-channel pipette is available, fill each chamber of the moat with 400 μL of sterile water or PBS (total 3200 μL).
- Add 80 μL of growth medium only (no cells) to wells A and H. These are background correction wells.
- Add 80 μL of growth medium only (no cells) to wells A and H for XFp miniplates. These are background correction wells.
- Harvest and re-suspend the cells to desired final concentration to seed in 80 μL of growth medium. Optimal cell seeding numbers vary widely, though are typically between 5×10 3 – 4×10 4 cells per well and must be determined empirically. (For example, for 1 x 10 4 cells per well, resuspend cells 1 x 10 4 per 80 μL = 1.25 x 10 5 cells per mL)
- For cell seeding density optimization experiments, choose 2-4 cell densities to test, based on standard or accelerated workflow described above. Either cover the range found in the references above, or seed the recommended cells/well value (1X) plus 0.5X, 2X and 4X cells per well.
- Remove a three-pack of miniplates from the blue box.
- Remove the foil seal from the tub(s) that will be used.
- Add sterile water or PBS to the moat around the cell culture wells. Use an 8-channel pipettor set to 200 μL, and fill both sides of the moat (two tips will fit into each chamber). If no multi-channel pipette is available, fill each chamber of the moat with 400 μL of sterile water or PBS (total 3200 μL).
- Add 80 μL of growth medium only (no cells) to wells A and H for XFp miniplates. These are background correction wells.
- Harvest and resuspend cells in warm growth medium to the desired concentration. See table for example, if 1 x 10 4 cells per well is desired for a XFp miniplate, resuspend cells in a volume that results in 1 x 10 4 cells /80 µL per well or 1.25 x 10 5 cells/mL.
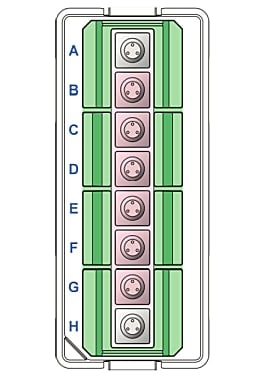
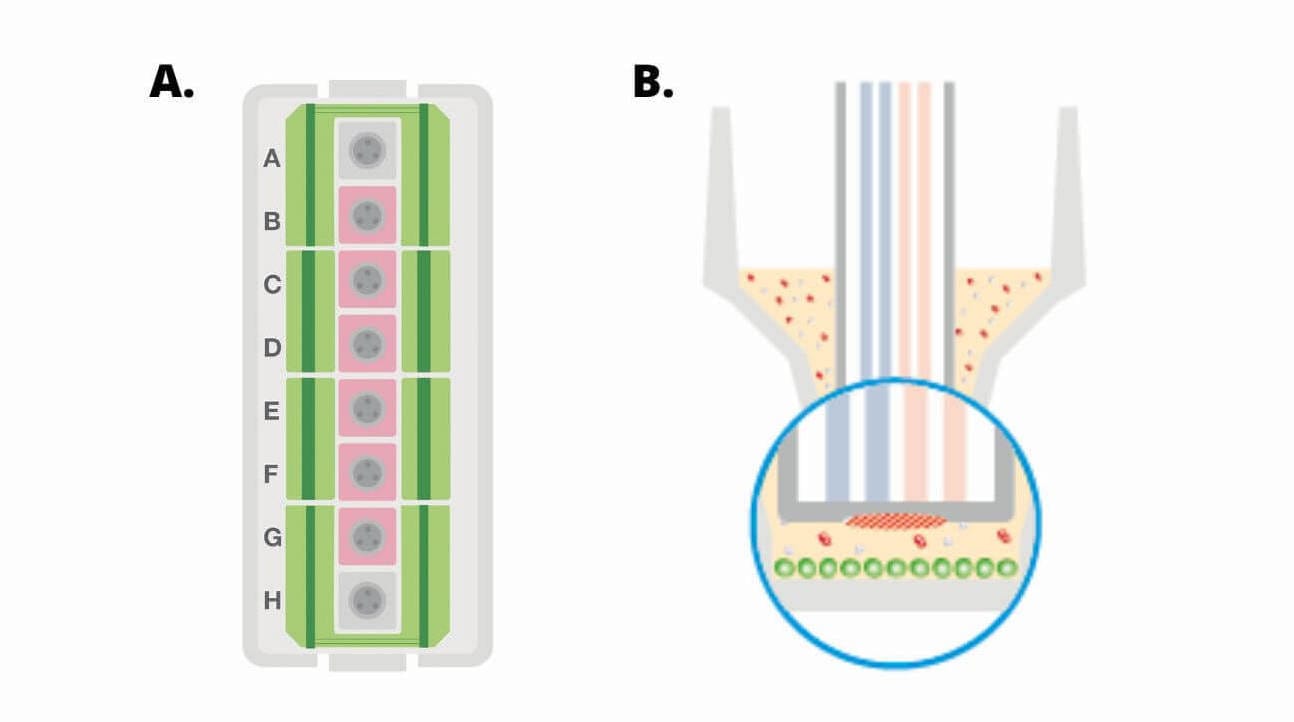
(A) Diagram of a Seahorse XFp miniplate illustrating moat with 8 chambers (green), 6 sample wells (B-G, pink) and background wells (A, H, grey). (B) Cross-section view of XFp miniplate well showing area of cell seeding (green circles).
| Plate type | Final adherent cell seeding volume | Final seeding density (Example only) | Converted to mL |
|---|---|---|---|
| XFp miniplates / XFp PDL miniplates | 80 μL | 1.0 × 10 4 cells / 80 µL | 1.25 × 10 5 cells/mL |
Basic procedures for seeding adherent cells (typically performed the day before the XF assay)
- A two-step seeding process is recommended when seeding Agilent Seahorse XF24 Cell Culture Microplates. The two-step process produces a consistent and even monolayer of cells.
- Harvest and re-suspend the cells to desired final concentration to seed in 80 μL of growth medium. Optimal cell seeding numbers vary widely, though are typically between 5 × 10 3 – 4 × 10 4 cells per well and must be determined empirically. (For example, for 1 x 10 4 cells per well, resuspend cells 1 x 10 4 per 80 μL = 1.25 x 10 5 cells per mL)
- Harvest and re-suspend the cells to desired final concentration to seed in 100 μL of growth medium. Optimal cell seeding numbers vary widely, though are typically between 1×10 4 – 8×10 4 cells per well and must be determined empirically. (For example, for 2 x 10 4 cells per well, resuspend cells 2 x 10 4 per 100 μL = 2.0 x 10 5 cells per mL)
- Seed 80 μL of cell suspension per well; do not seed cells in background correction wells (A1, A12, H1, H12). Be sure to put medium only (no cells) in the background correction wells.
- Seed 80 μL of cell suspension per well in wells B - G, do not seed cells in background correction wells (A and H). Be sure to put medium only (no cells) in the background correction wells.
- Seed 80 µL of cell suspension per well. Do not add cells to background wells A and H. If bubbles are observed at the bottom of the well, the plates may be centrifuged 1 to 2 minutes at 200 × g to remove them.
- Seed 100 μL of cell suspension per well; do not seed cells in background correction wells (A1, B4, C3, D6). Be sure to put medium only (no cells) in the background correction wells.
- IMPORTANT: Allow plate to rest at room temperature in the tissue culture hood for one hour. 1 This can promote even cell distribution and reduce edge effects for some cell types. Monitor adherence using a microscope.
- Place the plate in a standard cell culture incubator to allow cells to adhere. This generally takes approximately 1 hour for strongly adherent cells, but may take 5-6 hours for less adherent cell types. Monitor adherence using a microscope.
- After the one hour rest step, check cells for adherence.
- If cells are well-adhered, dispense an additional 150 μL of cell growth media to each well (250 µL total), then transfer plate to a standard cell culture incubator.
- If cells are not well-adhered to the plate, allow an additional 1-5 hours for the cells to firmly attach (in the biosafety cabinet), then add an additional 150 µL of growth media to each well (250 µL total) and transfer plate to a standard cell culture incubator.
- After cells have adhered, add 150 μl of growth medium to each well, bringing the total volume of medium in the well to 250 μl. When adding medium to the wells, add it slowly to the sides as not to disturb the newly attached cells.
- Allow the cells to grow overnight in a cell culture incubator. Monitor growth and health of cells using a microscope.
2.4.2 XF HS miniplates
- For cell seeding density optimization experiments, choose 2-4 cell densities to test, based on standard or accelerated workflow described above. Either cover the range found in the references above, or seed the recommended cells/well value (1X) plus 0.5X, 2X and 4X cells per well.
- Remove a three-pack of miniplates from the blue box.
- Remove the foil seal from the tub(s) that will be used.
- Add sterile water or PBS to the moat around the cell culture wells. Use an 8-channel pipettor set to 200 μL, and fill both sides of the moat (two tips will fit into each chamber). If no multi-channel pipette is available, fill each chamber of the moat with 400 μL of sterile water or PBS (total 3200 μL).
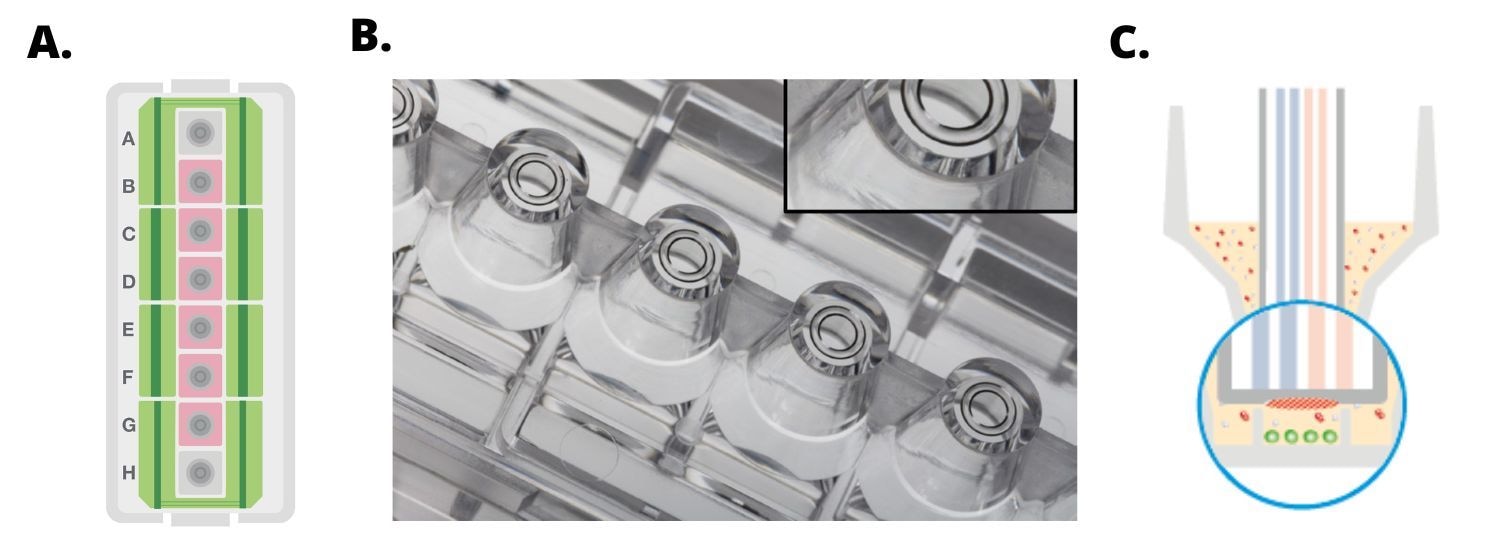
(A) Diagram of a Seahorse XF HS miniplate illustrating moat with 8 chambers (green), 6 sample wells (B-G, pink) and background wells (A, H, grey). (B) The Seahorse XF HS miniplate plates features a “ring” structure at the base of each well, which confines the cells to a smaller surface area, thereby forming a smaller microchamber volume and thus the ability to use fewer cells per well. (C) Cross-section view of HS miniplate well showing ring structure and area of cell seeding (green circles).
- Add 30 μL growth media (no cells) to wells A and H. These are background correction wells.
- Harvest and resuspend cells in warm growth medium to the desired concentration. See table for example, if 3.0 x 10 3 cells per well is desired for an XF HS miniplate, resuspend cells in a volume that results in 3.0 x 10 3 cells/30 µL per well or 1.0 x 10 5 cells/mL.
| Plate type | Final adherent cell seeding volume | Final seeding density (Example only) | Converted to mL |
|---|---|---|---|
| XF HS miniplates / XF HS PDL miniplates | 30 μL | 3.0 × 10 3 cells / 30 µL | 1.0 × 10 5 cells/mL |
- Seed 30 µL of cell suspension to the inner ring element of each well. It is recommended to seed cells one well at a time in XF HS miniplates (the pipette tip must be placed at the bottom of the well and the plunger depressed firmly but consistently to dispense the cell suspension properly). Do not add cells to background wells A and H. If bubbles are observed at the bottom of the well, the plates may be centrifuged 1 to 2 minutes at 200 × g to remove them.
- IMPORTANT: Allow plate to rest at room temperature in the tissue culture hood for one hour. 1 This can promote even cell distribution and reduce edge effects for some cell types. Monitor adherence using a microscope.
- Allow the cells to grow overnight in a cell culture incubator. Monitor growth and health of cells using a microscope.
2.5 Prepare XFp PDL or XF HS PDL miniplates (suspension cells only)
Analyzing non-adherent cells (e.g. T cells, leukemia cell line, etc.) using XF technology requires immobilizing cells to the bottom of the wells. This is enabled by coating the bottom of each well with poly D-lysine (PDL). Agilent provides ready-to-use PDL-coated XFp and XF HS miniplates. They are validated and recommended for use with T cells. Prewarm the ready-to-use PDL plates in a 37°C non-CO2 incubator overnight prior to use for seeding cells (minimally 6 hours).
Day prior to XF assay
Prepare XFp PDL or HS PDL Miniplates
- Obtain the XFp PDL or XF HS PDL Miniplates and Remove the foil seal(s) from the plate(s) that will be used.
- Place the plates in a non-humidified, non-CO2 37 °C incubator overnight.
Note: The XFp PDL and XF PDL HS Miniplates are compatible with Agilent XFp Miniplate Carrier Trays (part number 103057-100).
Seeding suspension cells is typically performed on the day of your XF assay, view instructions for seeding suspension cells in section 3.2.
Related Support Material
- Seeding Adherent Cells in Agilent Seahorse XF96 Cell Culture Microplates
- Seeding Adherent Cells in Agilent Seahorse XF24 Cell Culture Microplates
- Seeding Adherent Cells in Agilent Seahorse XFp Cell Culture Miniplates
- Seeding Adherent Cells in Agilent Seahorse XF HS Miniplates
- Methods for Reducing Cell Growth Edge Effects in Agilent Seahorse XF Cell Culture Microplates
- Immobilization of Non-Adherent Cells with Cell-Tak for Assay on the Agilent Seahorse XFe/XF96 or XFp Analyzer
- Seeding Suspension Cells in Agilent Seahorse XF HS Miniplates
- Immobilization of Non-Adherent Cells with Cell-Tak for Assay on the Agilent Seahorse XFe/XF24 Analyzer
- Cell Characterization: The XFe96/XF96 Analyzer and the Seahorse XF Real-Time ATP rate assay
- Cell Characterization: The XF24 Analyzer and the Cell Energy Phenotype Test
- Cell Characterization: The XFp Analyzer and the Seahorse XFp Real-Time ATP rate assay
- Cell Characterization: The XF HS Mini Analyzer and the XF Real‐Time ATP Rate Assay
- Cell Characterization: The XF HS Mini Analyzer with the HS Miniplate and the XF Real-Time ATP Rate Assay
Reference Material
- Agilent Seahorse Assay Guides and Templates
- Agilent Seahorse Assay Guides and Templates
- Agilent Seahorse Assay Guides and Templates
- Agilent Seahorse Assay Guides and Templates
- Agilent Seahorse Assay Guides and Templates
- Agilent Seahorse Templates
- Agilent Cell Analysis Publication Database
Browse the full list of publications using Agilent Cell Analysis data.

Showing only information for the Seahorse
3. Set up your XF Assay
This section focuses on techniques performed the day of your XF p assay, including assay media preparation. Seeding non-adherent cells, and loading XF p Sensor Cartridge ports with solutions for injection.
Select a workflow step to display help content.
3.1 Prepare Cartridge and Assay Medium
Prepare the Cartridge
- Remove the conical tube of calibrant and assembled sensor cartridge with utility plate from the incubator.
- Place the sensor cartridge upside down next to the utility plate.
- Remove and discard the water from the utility plate.
- Fill each well of the utility plate with 200 μL of the pre-warmed XF Calibrant.
- Fill the moats around the outside of the wells with 400 μL of XF Calibrant per chamber.
- Lower the sensor cartridge onto the utility plate, submerging the sensors in calibrant.
- Place assembled sensor cartridge with utility plate in a non-CO2 37° C incubator for 45 – 60 minutes prior to loading the injection ports of the sensor cartridge.
- Remove the assembled sensor cartridge with Hydro Booster and Utility plate from the incubator.
- Place the sensor cartridge upside down next to the utility plate.
- Remove and discard the Hydro Booster.
- Lower the sensor cartridge onto the utility plate, submerging the sensors in calibrant.
- Return the assembled sensor cartridge with utility plate to the non-CO2 37° C incubator until needed for loading the injection ports of the sensor cartridge.
Allow the assembled sensor cartridge with utility plate to incubate in the non-CO2 37° C incubator until needed for loading the injection ports of the sensor cartridge.

Prepare the XF Assay Medium
Seahorse assays require specific media for accurate, consistent functional measurement of metabolic activity.
Agilent provides ready-to-use, low buffered media, pre-adjusted to pH 7.4, that with compatible supplements, can streamline assay preparation and provide consistent assay conditions. View ordering information on this ready-to-use XF assay Media System or download the media selection guide.
Alternatively, researchers can formulate media with a composition that matches the assay kit being used. All compositions can be prepared using one of the Agilent Seahorse XF Media and adding different substrates/buffer as determined by the specific assay design, the example below is the Seahorse XF Real-Time ATP rate assay Cell Energy Phenotype Test .
Prepare the following XF Assay Medium to use with the Seahorse XF Real-Time ATP rate assay kit.
Researchers should formulate XF assay media with a composition that matches the assay kit being used. All compositions can be prepared using one of the Agilent Seahorse XF Media and adding different substrates/buffer as determined by the specific assay design, the example below is the Seahorse XF Real-Time ATP rate assay kit Cell Energy Phenotype Test .
Prepare the following XF Assay Medium to use with the Cell Energy Phenotype Test.
| Agilent Reagent / Agilent Part Number | Final Concentration | Volume | |||
|---|---|---|---|---|---|
| Seahorse XF DMEM Medium, pH 7.4 a, b / 103575-100 or Seahorse XF RPMI Medium, pH 7.4 a, b / 103576-100 | XF Base Medium (w/out Phenol Red) a, b / 103335-100 or XF RPMI (w/out Phenol Red) a, b / 103336-100 | Seahorse XF DMEM medium a,b / 103575-100 or Seahorse XF RPMI medium a,b / 103576-100 | - | 97.0 mL | 9.70 mL |
| Seahorse XF Glucose (1.0 M solution) / 103577-100 | 10 mM | 10 μL | 10 mM | 1.0 mL | 100 μL |
| Seahorse XF Pyruvate (100 mM solution) / 103578-100 | 1 mM | 1.0 mL | 100 μL | ||
| Seahorse XF L-Glutamine (200 mM solution) / 103579-100 | 2 mM | 1.0 mL | 100 μL | ||
| a XF DMEM and RPMI Medium, pH 7.4 have a pre-adjusted pH value and do not require adjustment of pH upon addition of XF supplements. See method below for preparation. Seahorse XF DMEM Medium pH 7.4 and RPMI Medium, pH 7.4 are not compatible with XF24 Analyzers. b Preparation using alternative types of XF media Preparation using alternative types of XF media Preparation using alternative types of XF media Preparation using alternative types of XF media Preparation using alternative types of XF media . | |||||
Basic procedures for preparing XF DMEM Medium pH 7.4 or XF RPMI Medium pH 7.4
Basic procedures for preparing XF Base Medium (w/o Phenol Red) or XF RPMI (w/o Phenol Red)
- 37°C water bath
- Calibrated pH meter
- Stir plate
- Sterile filter bottles (0.22 μm filter) and cap
- 1.0 N NaOH solution
Agilent Seahorse XF DMEM Medium pH 7.4 and XF RPMI Medium pH 7.4 are designed to provide:
- Convenience: No adjustment of final pH is required when used as recommended with Agilent Seahorse XF Supplements.
- Consistency: Low concentrations of HEPES buffer (5 mM, DMEM; 1 mM, RPMI) provide more consistent XF data.
- Quantitation: Using assay medium with a fixed buffer capacity allows for quantitative measurement of proton efflux rate (PER).
- Warm appropriate volume of XF DMEM Medium pH7.4 or XF RPMI Medium pH 7.4 to 37°C in a sterile bottle. In general, 10 0 mL is sufficient for one plate.
- Warm appropriate volume of XF Base Medium (w/o Phenol Red) or XF RPMI (w/o Phenol red) to 37°C in a sterile bottle. In general, 100 mL is sufficient for one XF24 plate.
- Add appropriate volumes of Seahorse XF supplements (XF Glucose solution, XF Pyruvate solution and XF L-Glutamine solution) indicated in the table above.
- Adjust pH value of the medium to 7.4 using 1 N NaOH. Note: pH value will change quickly upon addition of NaOH, use small volumes and add slowly to adjust pH value.
- Sterilize assay medium with a 0.2 μm filter.
- Incubate the final XF Assay Medium at 37 °C until ready for use
Related Support Material
- Training Webinar: Set up and run your XF Assay
- How to Hydrate an Agilent Seahorse XFe96 Sensor Cartridge
- How to Hydrate an Agilent Seahorse XFe24 Sensor Cartridge
- How to Hydrate an Agilent Seahorse XF24 Sensor Cartridge
- How to Hydrate an Agilent Seahorse XFp Sensor Cartridge
- Preparation of XF Assay Media
- Cell Characterization: The XFe96/XF96 Analyzer and the Seahorse XF Real-Time ATP rate assay
- Cell Characterization: The XFp Analyzer and the Seahorse XFp Real-Time ATP rate assay
- Cell Characterization: The XF HS Mini Analyzer and the XF Real‐Time ATP Rate Assay
- Cell Characterization: The XF HS Mini Analyzer with the HS Miniplate and the XF Real-Time ATP Rate Assay
- Cell Characterization: The XF24 Analyzer and the Seahorse XF Real-Time ATP rate assay
- Cell Characterization: The XFe24 Analyzer and the Seahorse XF Real-Time ATP rate assay
Reference Material
- Agilent Seahorse Assay Guides and Templates
- Agilent Seahorse Assay Guides and Templates
- Agilent Seahorse Assay Guides and Templates
- Agilent Seahorse Assay Guides and Templates
- Agilent Seahorse Assay Guides and Templates
- Agilent Seahorse Templates
- Agilent Cell Analysis Publication Database
Browse the full list of publications using Agilent Cell Analysis data.
3.2 Wash Cells
Basic procedure for washing adherent cells seeded on XFp miniplates
Note: For washing adherent cells in XF HS miniplates or XF HS PDL miniplates, please follow the instructions found in the Related Support Material below.
For adherent cells seeded at least one day prior to the XF p HS Mini assay:
- Retrieve the cell culture mini plate from the CO2 incubator.
- View the cells under the microscope to:
- Confirm cell health, morphology, seeding uniformity and purity (no contamination).
- Ensure cells are adhered, with a consistent monolayer.
- Make sure there are no cells in the background correction wells.
- Wash adherent cells with complete assay medium: one time with XF Real-Time ATP Rate Assay Media:
- Remove all but 20 μL of the culture medium from each well. The small amount of medium is left to keep the cells from drying out.
- Gently add 200 μL of assay medium.
- Place the plate in a 37 °C incubator without CO2 for one hour prior to the assay.
- Remove all but 50 μL of the culture medium from each well. The small amount of medium is left to keep the cells from drying out.
- Gently add 1mL of assay medium.
- Place the plate in a 37°C incubator without CO2 for one hour prior to the assay.
- Repeat step b, removing all but 50 μL (as in step a).
- Add 450 μL assay medium (to a total volume of 500 μL) for a 24 well platform instrument.
- Just prior to starting the assay, wash the cells again with XF Real-Time ATP Rate Assay Media: remove all media but 50 μL and add fresh media to a final volume 500 μL. Inspect the cells under the microscope to ensure that cells were not disturbed or washed away.
- Just prior to starting the assay, wash the cells again with XF Real-Time ATP Rate Assay Media: remove all media but 20 μL and add fresh media to a final volume 180 μL. Inspect the cells under the microscope to ensure that cells were not disturbed or washed away.
- Observe the assay wells under the microscope to ensure that cells were not washed away.
- Place the plate in a 37° C incubator without CO2 for one hour prior to the assay.
3.2 Seeding Suspension Cells
Basic procedures for seeding suspension cells on XF HS PDL miniplates and XFp PDL miniplates
Note: For additional information on seeding suspension cells in XF HS PDL miniplates, please follow the instructions found in the Related Support Material below.
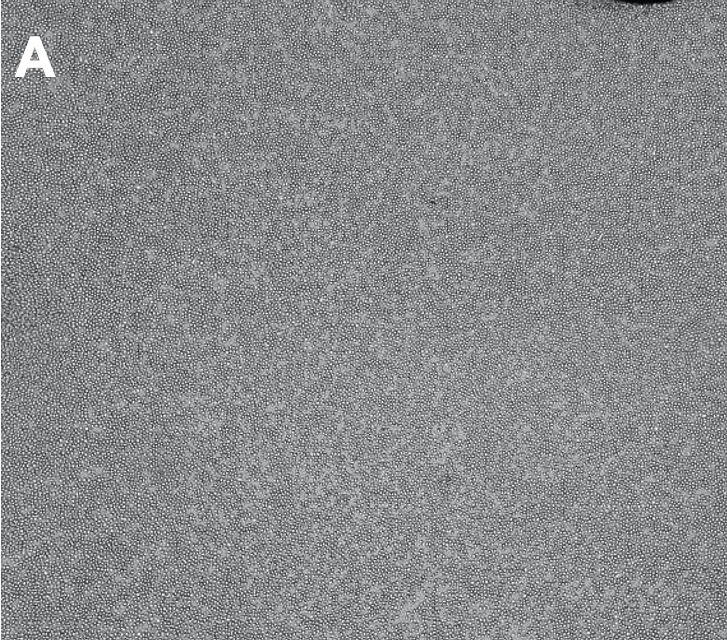
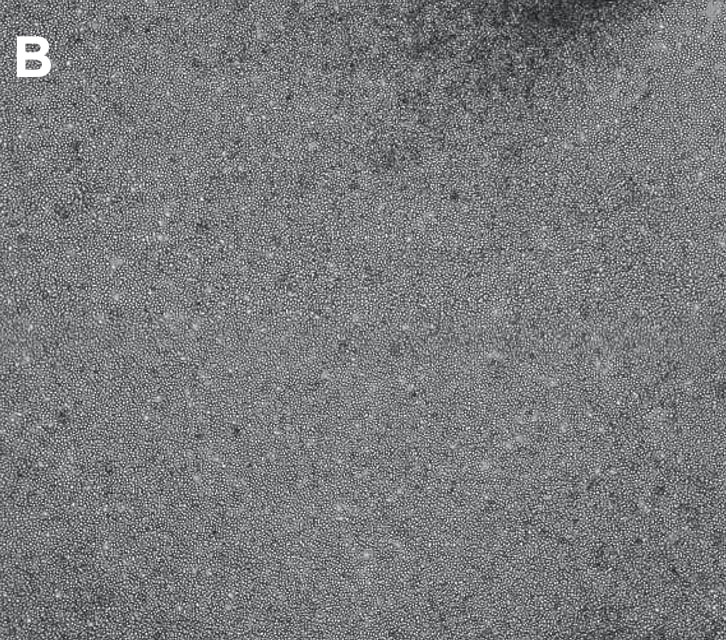
The optimal cell density for suspension cells varies depending on the cell size. In general, optimal cell seeding density should result in cell distribution in the well as a monolayer at 70-90% confluency. It is strongly encouraged to examine cell distribution under a microscope to look for (1) adequate space between cells to ensure all cells contact the coated surface evenly and (2) ensure minimal cell clusters. Seeding an excess number of cells above the optimal density or if the cells cluster together can result in poor cell adhesion and cause inaccurate rate measurements.
- Cell Culture Microplate, transfer an appropriate volume of cell suspension from the growth vessel to a conical tube.
- For one XFp Miniplate, XF HS Miniplate or XF HS PDL Miniplate, transfer an appropriate volume of cell suspension from the growth vessel to a conical tube.
- To calculate the total number of cells needed, multiply the desired number of cells per well times 100 wells for the Seahorse XFe96. (For example, 150,000 cells per well × 100 wells = 1.5 × 10 7 cells).
- To calculate the total number of cells needed, multiply the desired number of cells per well times 10 wells for the Seahorse . (For example, 150,000 cells per well × 10 wells = 1.5 × 10 6 cells).
- Centrifuge cells at room temperature at 200 × g for 5 minutes.
- While cells are being centrifuged, pipette 50 μL assay medium into background/control wells of the prewarmed PDL-coated Seahorse XF96 Cell Culture Microplates or Cell-Tak-coated Seahorse XF96 Cell Culture Plate.
- While cells are being centrifuged, pipette 50 μL assay medium into background/correction wells (A and H) of the prewarmed PDL-coated Seahorse XFp Cell Culture Microplates or Cell-Tak-coated Seahorse XFp Cell Culture Plate.
- Remove supernatant from the centrifuged conical tube.
- Resuspend cells in warmed assay medium to the desired concentration of cells per well in 50 μL of assay medium. (For example, 1.5 × 10 5 cells per well is desired, resuspend cells in a volume that results in 1.5 × 10 5 cell/50 μL or 3.0 × 10 6 cells/mL).
- Change centrifuge settings to zero braking.
- Transfer the cell suspension to a sterile tissue culture reservoir, or pipette from the conical tube.
- Pipette 50 μL of the cell suspension along the side of each well, except for background/control wells. It is recommended to use a multichannel pipette.
- Place the miniplate(s) in an XFp carrier tray and centrifuge at 300 x g for 1 min with no brake. The carriers are designed to hold up to 3 miniplates, and fit standard centrifuge microplate adapters. Ensure that the centrifuge rotor is balanced appropriately.
- After centrifugation, visually confirm adherence of the cells to the well bottom.
- Centrifuge the cells at 200 × g (zero braking) for 1 minute. Ensure that the centrifuge is properly balanced.
- Taking care not to disturb the cells on the bottom, gently add 130 μL assay medium to each well to the desired initial assay volume (for 180 μL starting assay volume).
- Add sterile water or PBS to the moat around the cell culture wells, 100 μL per chamber. Using an 8-channel pipettor (if available) set to 50 μL, fill both sides of the moat using two tips per chamber. If no multi-channel pipette is available, individually fill each chamber of the moat with 100 μL of sterile water or PBS (total 800 μL).
- Transfer plates to a 37° C incubator not supplemented with CO2 for 25–30 minutes to ensure that the cells have completely attached. Visually confirm that most of the cells are stably adhered to the culture surface.
- Slowly and gently, add 130 μL warm assay medium along the side of each well. Take care to avoid disturbing the cells.
- Observe the cells under the microscope to check that cells are not detached.
- Return the cell plate to the incubator for 15–25 minutes.
- After 15–25 minutes, the cell plates are ready for your assay. Total time following centrifugation should be no greater than 1 hour for best results.
- For one Seahorse XF24 Cell Culture Microplate, transfer an appropriate volume of cell suspension from the growth vessel to a conical tube.
- To calculate the total number of cells needed, multiply the desired number of cells per well times 25 wells for the Seahorse XF24. (For example, 150,000 cells per well × 25 wells = 3.75 × 10 6 cells).
- Centrifuge cells at room temperature at 200 × g for 5 minutes.
- While cells are being centrifuged, pipette 100 μL assay medium into background/control wells of the room-temperature Cell-Tak-coated Seahorse XF24 Cell Culture Plate.
- Remove supernatant from the centrifuged conical tube.
- Resuspend cells in warmed assay medium to the desired concentration of cells per well in 100 uL of assay medium. (For example, 1.5 × 10 5 cells per well is desired, resuspend cells in a volume that results in 1.5 × 10 5 cell/100 μL or 1.5 × 10 6 cells/mL).
- Change centrifuge settings to zero braking.
- Transfer the cell suspension to a sterile tissue culture reservoir, or pipette from the conical tube.
- Pipette 100 μL of the cell suspension along the side of each well, except for background/control wells. Agilent recommends using a multichannel pipette.
- Centrifuge the cells at 200 × g (zero braking) for 1 minute. Ensure that the centrifuge is properly balanced. For XFp Analyzer users, Agilent recommends using the Agilent Seahorse XFp Carrier Tray to centrifuge the Seahorse XFp Cell Culture Miniplates. For more details, refer to the Basic Procedure: Seeding Suspension Cells in XFp Cell Culture Miniplates.
- Transfer plates to a 37° C incubator not supplemented with CO2 for 25–30 minutes to ensure that the cells have completely attached. Visually confirm that most of the cells are stably adhered to the culture surface.
- Slowly and gently, add 400 μL warm assay medium along the side of each well. Take care to avoid disturbing the cells.
- Observe the cells under the microscope to check that cells are not detached.
- Return the cell plate to the incubator for 15–25 minutes.
- After 15–25 minutes, the cell plates are ready for your assay. Total time following centrifugation should be no greater than 1 hour for best results.
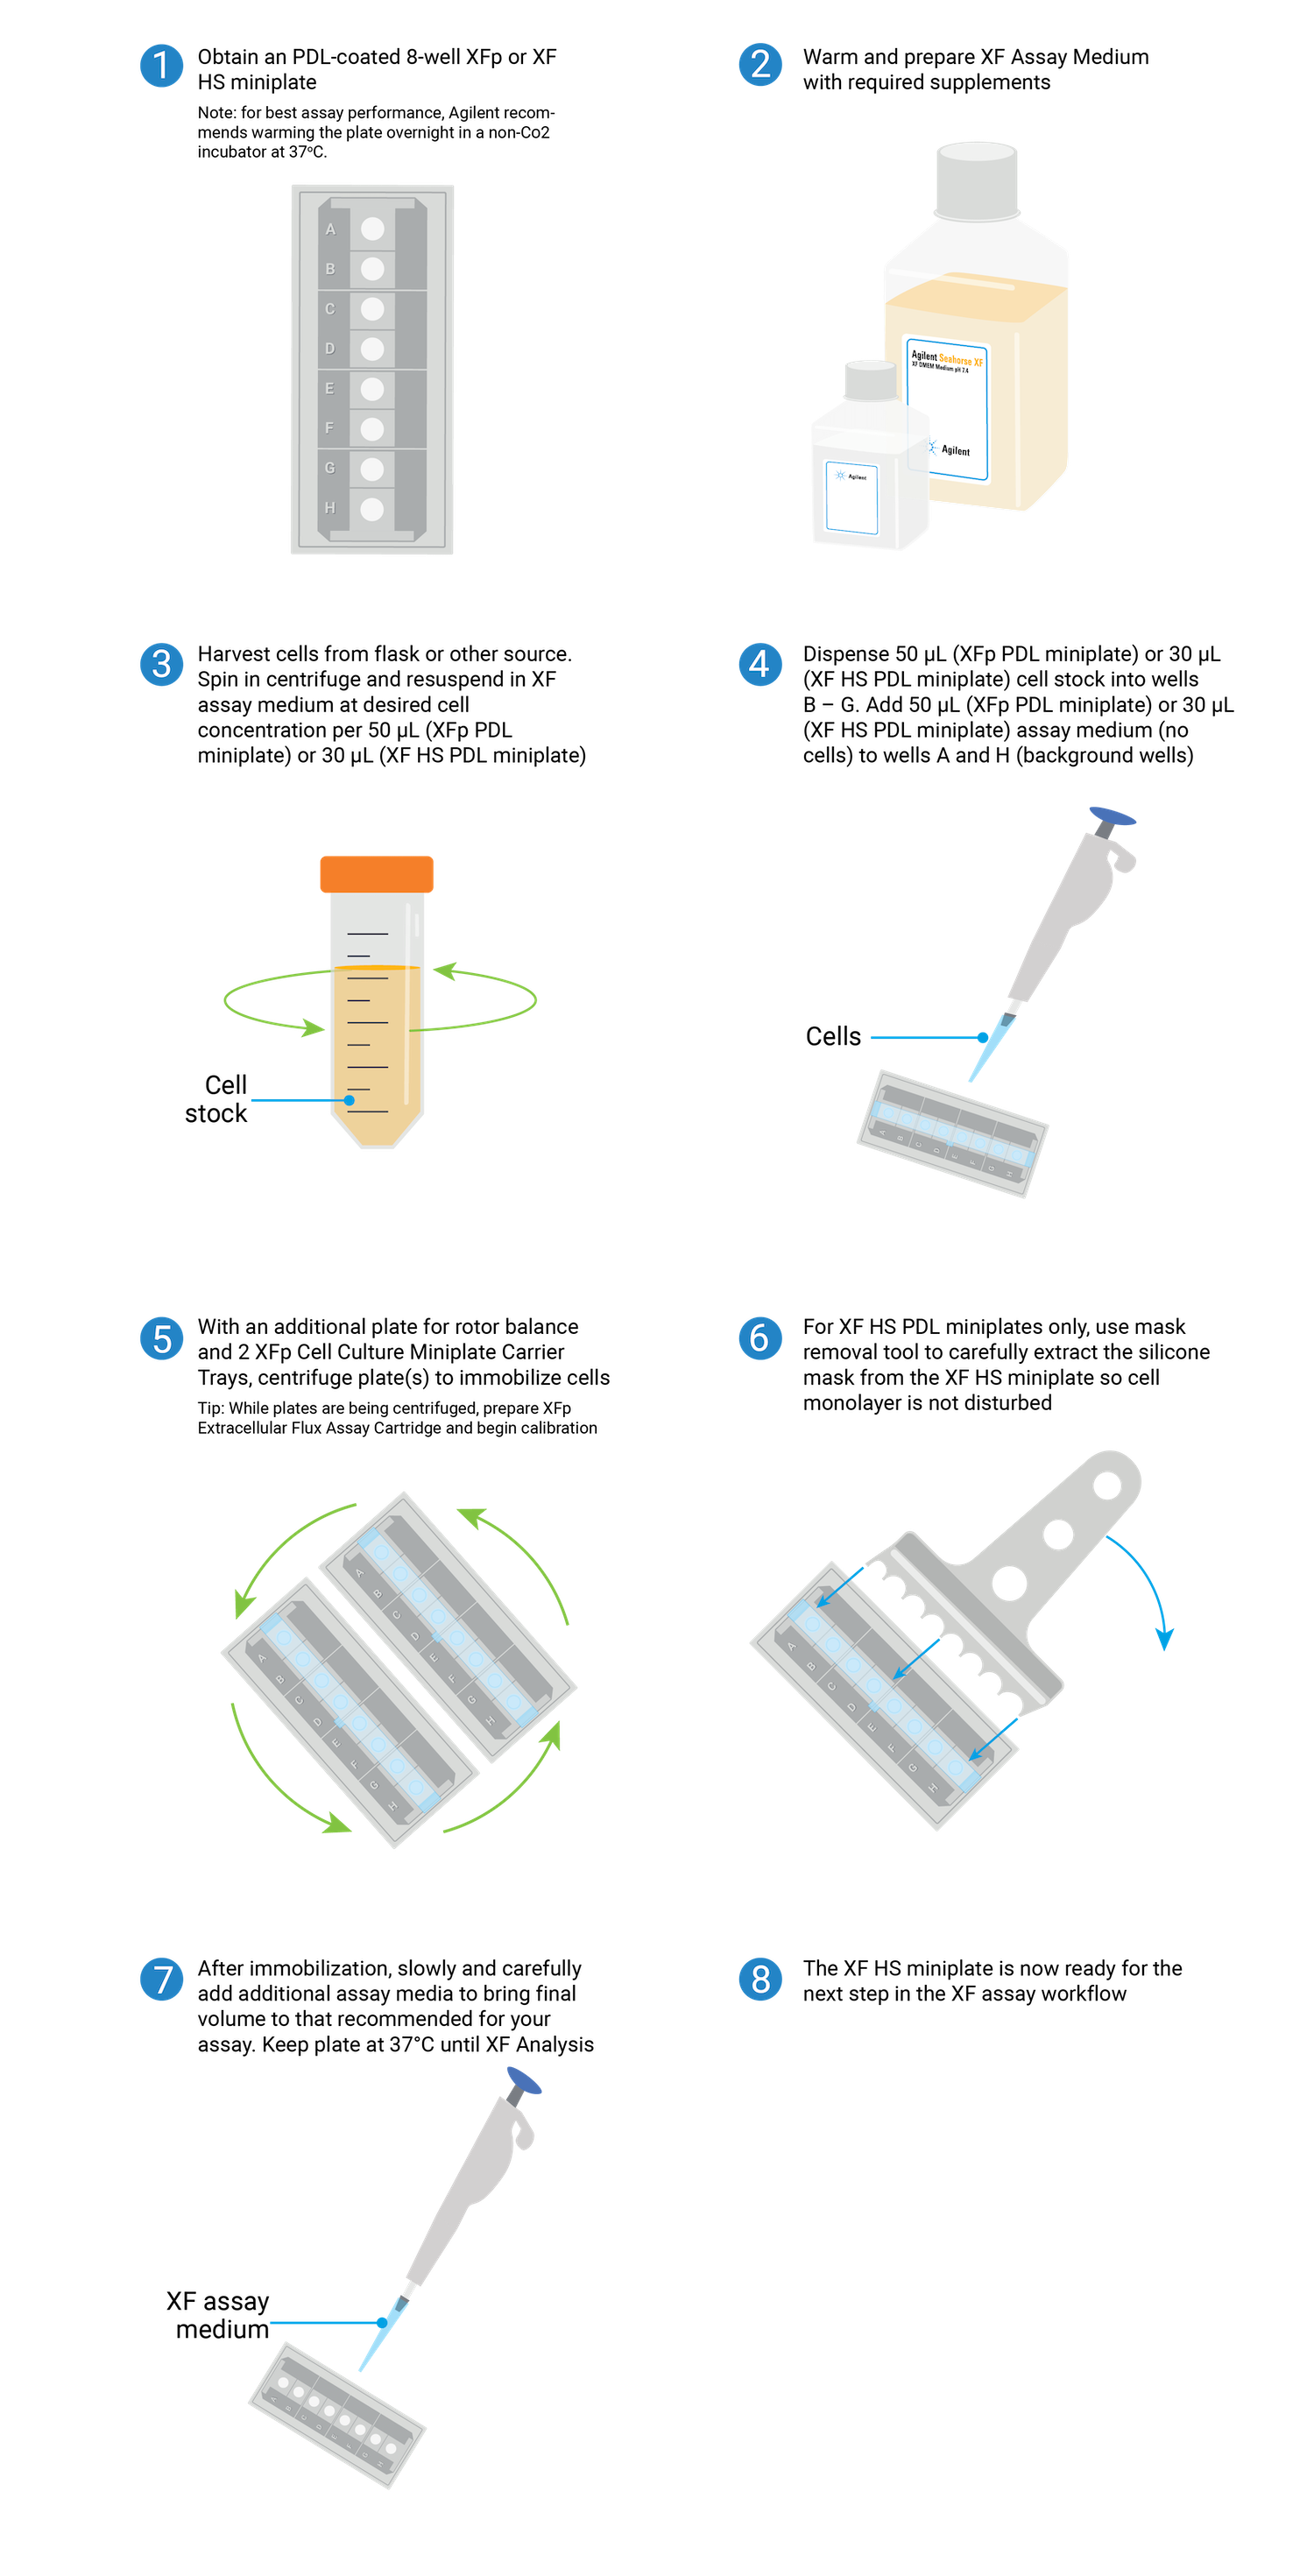
Overview of the steps required for seeding suspension cells on XFp PDL or XF HS PDL miniplates.
Related Support Material
- Washing Adherent Cells in Agilent Seahorse XFp Cell Culture Miniplates
- Washing Adherent Cells in Agilent Seahorse XF96 Cell Culture Microplates
- Washing Adherent Cells in Agilent Seahorse XF24 Cell Culture Microplates
- Washing Adherent Cells in Agilent Seahorse XF96 Cell Culture Microplates
- Washing Adherent Cells in Agilent Seahorse XF24 Cell Culture Microplates
- Immobilization of Non-Adherent Cells with Cell-Tak for Assay on the Agilent Seahorse XFe96/XF96 or XFp Analyzer
- Immobilization of Non-Adherent Cells with Cell-Tak for Assay on the Agilent Seahorse XFe24/XF24 Analyzer
- Seeding Suspension Cells in Agilent Seahorse XF HS Miniplates
- Seeding Suspension Cells in Agilent Seahorse XFp Cell Culture Miniplates
- Cell Characterization: The XFe96/XF96 Analyzer and the Seahorse XF Real-Time ATP rate assay
- Cell Characterization: The XF24 Analyzer and the Cell Energy Phenotype Test
- Cell Characterization: The XFe24 Analyzer and the Seahorse XF Real-Time ATP rate assay
- Cell Characterization: The XFp Analyzer and the Seahorse XF Real-Time ATP rate assay
- Cell Characterization: The XF HS Mini Analyzer and the XF Real‐Time ATP Rate Assay
- Cell Characterization: The XF HS Mini Analyzer with the HS Miniplate and the XF Real-Time ATP Rate Assay
Reference Material
- Agilent Seahorse Assay Guides and Templates
- Agilent Seahorse Assay Guides and Templates
- Agilent Seahorse Assay Guides and Templates
- Agilent Seahorse Assay Guides and Templates
- Agilent Seahorse Assay Guides and Templates
- Agilent Seahorse Templates
- Agilent Cell Analysis Publication Database
Browse the full list of publications using Agilent Cell Analysis data.
3.2.1 XFp PDL miniplates
- Obtain XFp PDL miniplate from the nonhumidified, non-CO2 37 °C incubator.
- Add sterile water or PBS to the moat around the cell culture wells, 400 μL per chamber. Using an eight-channel pipettor (if available) set to 200 μL, fill both sides of the moat using two tips per chamber. If no multichannel pipette is available, individually fill each chamber of the moat with 400 μL of sterile water or PBS (total 3200 μL).
- Determine the desired seeding concentration. Optimal cell density for suspension cells varies depending on the cell size. For XFp PDL miniplates seeding numbers are typically between 5 × 10 4 and 2 × 10 5 cells/well.
- Calculate the total number of cells needed by multiplying the desired number of cells per well by 10 wells for each miniplate. (For example, 150,000 cells per well × 10 wells = 1.5 × 10 6 cells). Then transfer an appropriate volume of cell suspension from the growth vessel to a conical tube.
- Centrifuge cells at room temperature at 200 × g for 5 minutes. Then remove supernatant from the centrifuged conical tube and resuspend cells in warm assay medium to the desired concentration. For example, if 1.5 x 10 5 cells per well is desired, resuspend cells in a volume that results in 1.5 x 10 5 cells /50 µL per well or 1.0 x 10 6 cells/mL.
- Pipette 50 µL assay medium to background wells (A and H).
- Change centrifuge settings to zero braking.
- Transfer the cell suspension to a sterile tissue culture reservoir, or pipette from the conical tube.
- Pipette 50 μL of the cell suspension along the side of each well, except for background/control wells (A and H). It is recommended to use a multichannel pipette.
- Upon adding cells or media to the plate, it is possible that bubbles may form at the bottom of the well. These bubbles will likely be removed upon centrifugation.
- Place the miniplate(s) in an XFp carrier tray and centrifuge at 200 x g for 1 min to allow cells to attach to the bottom of the wells. The carriers are designed to hold up to three miniplates and fit standard centrifuge microplate adapters. Ensure that the centrifuge rotor is balanced appropriately.
- After centrifugation, visually confirm adherence of the cells to the well bottom.
- Gently add 130 µL assay medium to each well to the desired initial assay volume (for 180 μL starting assay volume).
- Transfer plates to a 37 °C, non-CO2 incubator for 45–60 minutes before use. Visually confirm that most of the cells are stably adhered to the culture surface.
- The total time following centrifugation should be no greater than 1 hour for best results.
- Go to section 3.4
3.2.2 XF HS PDL miniplates

- Obtain XF HS PDL miniplate from the nonhumidified, non-CO2 37 °C incubator.
- Add sterile water or PBS to the moat around the cell culture wells, 400 μL per chamber. Using an eight-channel pipettor (if available) set to 200 μL, fill both sides of the moat using two tips per chamber. If no multichannel pipette is available, individually fill each chamber of the moat with 400 μL of sterile water or PBS (total 3200 μL).
- Determine the desired seeding concentration. Optimal cell density for suspension cells varies depending on the cell size. For XF HS PDL miniplates, seeding numbers are typically between 2.0 × 10 4 and 7.0 × 10 4 cells per well.
- Calculate the total number of cells needed by multiplying the desired number of cells per well by 10 wells for each miniplate. (For example, 150,000 cells per well × 10 wells = 1.5 × 10 6 cells). Then transfer an appropriate volume of cell suspension from the growth vessel to a conical tube.
- Centrifuge cells at room temperature at 200 × g for 5 minutes. Then remove supernatant from the centrifuged conical tube and resuspend cells in warm assay medium to the desired concentration. For example, if 3 x 10 4 cells/well is desired, resuspend cells in a volume that results in 3 x 10 4 cells /30 µL per well or 1.0 x 10 6 cells/mL.
- Pipette 30 µL assay medium to background wells (A and H).
- Change centrifuge settings to zero braking.
- Transfer the cell suspension to a sterile tissue culture reservoir, or pipette from the conical tube.
- Pipet 30 µL of cell suspension to the inner ring element of each well. It is recommended to seed cells one well at a time using 200 μL (or smaller) pipette tips. The pipette tip must be placed at the bottom of the well to dispense properly. Do not add cells to background wells A and H.
- Upon adding cells or media to the plate, it is possible that bubbles may form at the bottom of the well. These bubbles will likely be removed upon centrifugation.
- Place the miniplate(s) in an XFp carrier tray and centrifuge at 200 x g for 1 min to allow cells to attach to the bottom of the wells. The carriers are designed to hold up to three miniplates and fit standard centrifuge microplate adapters. Ensure that the centrifuge rotor is balanced appropriately.
- After centrifugation, visually confirm adherence of the cells to the well bottom.
- Carefully remove the silicon mask using the mask removal tool, as follows:
- With one hand, hold the plate flat on the bench or working surface. With the other hand, insert the tool between the top of the plate and the mask.
- The prongs of the removal tool should remain parallel to the top surface of the plate while they’re being inserted.
- Do not lever them back and forth to insert the tool further – this will create suction and potentially disturb the cell layer.
- The goal is to remove the mask in one motion from all wells at the same time.
- Once the tool has been inserted completely, use it as a lever to remove the mask.
- The mask will not stay on the prongs – once the mask begins to separate from the plate, use a finger to hold it onto the tool so it does not fall onto the plate.
- Once removed, dispose of the plate mask.
(A) insert the prongs of the removal tool between each well, keeping the bottom of the tool parallel to the top of the plate.
(B) once the prongs are inserted, lever the mask from the wells of the plate.
(C) Hold the mask onto the removal tool with one finger as its being lifted from the plate to prevent it from falling.
Note: Media may be removed with the removal of the silicone mask. Approximately 20 μL of medium will be left in each well. If inconsistent volumes remain, carefully remove media only from the outer-ring area of the well, taking care not to touch the cells within the ring. Always leave some media to cover the cells. Small differences in the overall volume of each well will not impact OCR or ECAR, however the final concentration of injected reagents may be affected.
- Gently add 160 μL assay medium to each well to the desired initial assay volume (for 180 μL starting assay volume).
- Transfer plates to a 37 °C non-CO2 incubator for 45–60 minutes before use. Visually confirm that most of the cells are stably adhered to the culture surface.
- The total time following centrifugation should be no greater than 1 hour for best results.
- Go to section 3.4
3.3 Basic procedure for washing adherent cells
3.3.1 Washing adherent cells on XFp miniplates
For adherent cells seeded at least one day before the XF HS Mini assay:

- Retrieve the cell culture miniplate from the CO2 incubator.
- View the cells under the microscope to:
- Confirm cell health, morphology, seeding uniformity, and purity (no contamination).
- Ensure that cells are adhered, with a consistent monolayer.
- Make sure that there are no cells in the background correction wells.
- Wash cells with XF assay medium:
- Remove all but 20 μL of the culture medium from each well. The small amount of medium is left to keep the cells from drying out.
- Gently add 200 μL of assay medium.
- Place the plate in a 37 °C incubator without CO2 for one hour prior to the assay.
- Just prior to starting the assay, wash the cells again with XF Real-Time ATP Rate Assay Media: remove all media but 20 μL and add fresh media to a final volume 180 μL. Inspect the cells under the microscope to ensure that cells were not disturbed or washed away.
3.3.2 Washing adherent cells on XF HS miniplates
For adherent cells seeded at least one day before the XF HS Mini assay:

- Retrieve the cell culture miniplate from the CO2 incubator.
- View the cells under the microscope to:
- Confirm cell health, morphology, seeding uniformity, and purity (no contamination).
- Ensure that cells are adhered, with a consistent monolayer
- Make sure that there are no cells in the background correction wells
- Remove the silicone mask using the mask removal tool prior to XF analysis:
- With one hand, hold the plate flat on the bench or working surface. Then, with the other hand, insert the tool between the top of the plate and the mask.
- The prongs of the removal tool should remain parallel to the top surface of the plate while they’re being inserted.
- Do not lever them back and forth to insert the tool further – this will create suction and potentially disturb the cell layer.
- The goal is to remove the mask in one motion from all wells at the same time.
- Once the tool has been inserted completely, use it as a lever to remove the mask.
- The mask will not stay on the prongs – once the mask begins to separate from the plate, use a finger to hold it onto the tool so it does not fall onto the plate.
- Once removed, dispose of the plate mask.
(A) insert the prongs of the removal tool between each well, keeping the bottom of the tool parallel to the top of the plate.
(B) once the prongs are inserted, lever the mask from the wells of the plate.
(C) Hold the mask onto the removal tool with one finger as its being lifted from the plate to prevent it from falling.
Note: Media may be removed with the removal of the silicone mask. Approximately 20 μL of medium will be left in each well. If inconsistent volumes remain, carefully remove media only from the outer-ring area of the well, taking care not to touch the cells within the ring. Always leave some media to cover the cells. Small differences in the overall volume of each well will not impact OCR or ECAR, however the final concentration of injected reagents may be affected.

- Wash cells with XF assay medium:
- Gently add 200 μL of assay medium, then remove all but 20 μL of the assay medium from each well, before repeating the wash process.
- Finally, add assay medium (~160 μL) to reach a starting volume of 180 μL.
- Observe the cell layer after washing to ensure that cells were not disturbed or washed away. Place the washed cell plate in a 37 °C non-CO2 incubator for 60 minutes before performing the assay.
Schematic illustration displaying the steps required for removing the silicone mask step 2 and washing samples in XF HS miniplates with XF assay medium
3.3 Assemble Solutions
3.4 Assemble Solutions
A key feature of the Agilent Seahorse Analyzer is its ability to inject reagents during the assay and see results in real time. This is accomplished by dispensing solutions that have been loaded into injector ports within the cartridge prior to placement in the instrument.
If performing initial cell characterization of cell density and/or FCCP titrations using the Cell Energy Phenotype Assay, prepare injection solution as described in the tables below.
If performing initial cell characterization of cell density using the Seahorse XFp Real-Time ATP rate assay, prepare injection solution as described in the tables below.
If performing initial cell characterization of cell density using the Seahorse XF Real-Time ATP rate assay, prepare injection solution as described in the tables below.
Cell Density Titration Assay Solution Assembly
FCCP Concentration Titration Assay Solution Assembly
- Remove one pouch from the Seahorse Seahorse XF Real-Time ATP rate assay Kit box, and remove both tubes (Oligo and Rotenone + Antimycin A).
- Remove one pouch from the Seahorse XF Cell Energy Phenotype Test Kit box, and remove both tubes (Oligo and FCCP).
- Using a pipette, resuspend the contents of each tube with prepared assay medium using the volumes described in the table below. Place a cap on the tube, and vortex for 1 minute to solubilize the compounds.
| Resuspension volumes for the Seahorse XF Real-Time ATP rate assay Kit | ||||
|---|---|---|---|---|
| Compound | Volume of XF Assay Media | Resulting Stock Concentration | ||
| Oligomycin | 420 µl | 168 µl | 150 µM | 75 µM |
| Rotenone + Antimycin A | 540 µl | 216 µl | 50 µM | 25 µM |
| Resuspension volumes for the XF Cell Energy Phenotype Test Kit | ||
|---|---|---|
| XF Cell Energy Phenotype Test Component | Volume of XF assay media (μL) | Resulting Stock Concentration (μM) |
| Oligomycin | 630 | 100 |
| FCCP | 720 | 100 |
- Prepare 3.0 mL of each injection solution by combining the appropriate volumes of XF Assay Media and stock oligomycin and stock rotenone/antimycin A as described in the table below.
- Using a 15 mL conical tube, prepare 3.0mL of the injection solution by combining the appropriate volumes of XF Assay Media, stock oligomycin and stock FCCP as described in the table below.
- Prepare 300 µL of each injection solution by combining the appropriate volumes of XF Assay Media and stock oligomycin and stock rotenone/antimycin A as described in the table below.
| Dilution volumes for XF Real Time ATP Rate Assay Kit - Cell Characterization | ||||||
|---|---|---|---|---|---|---|
| Port & Compound | Stock Volume | XF Assay Media Volume | 10X [Port] | [Final Well] | ||
| Port A Oligomycin | 300 µl | 60 µl | 2700 µl | 240 µl | 15 µM | 1.5 µM |
| Port B Rotenone + Antimycin A | 300 µl | 60 µl | 2700 µl | 240 µl | 5 µM | 0.5 µM |
| Dilution volumes for the XF Cell Energy Phenotype Test Kit - Cell Seeding Density Titration with XFe24/XF24 | |||||
|---|---|---|---|---|---|
| Final FCCP concentration in well | Volume of assay media (μL) | Volume of Stock Oligomycin (μM) | Volume of Stock FCCP (μL) | 10X Final Oligo (Port) Concentration (μM) | 10X Final FCCP (Port) Concentration (μM) |
| 0.25 | 875 | 100 | 25 | 10 | 2.5 |
| 0.5 | 850 | 100 | 50 | 10 | 5.0 |
| 1.0 | 800 | 100 | 100 | 10 | 10 |
| 2.0 | 700 | 100 | 200 | 10 | 20 |
If performing a different type of XF p HS Mini assay, consult the appropriate XF p HS Mini Kit User Guide for appropriate injection solution preparation instructions.
Related Support Material
- Loading the Agilent Seahorse Sensor Cartridge Injection Ports
- Loading the Agilent Seahorse XFe24 Sensor Cartridge Injection Ports
- Loading the Agilent Seahorse XF24 Sensor Cartridge Injection Ports
- Loading the Agilent Seahorse XFp Sensor Cartridge Injection Ports
- Cell Characterization: The XFe96/XF96 Analyzer and the Seahorse XF Real-Time ATP rate assay
- Cell Characterization: The XF24 Analyzer and the Cell Energy Phenotype Test
- Cell Characterization: The XFe24 Analyzer and the Seahorse XF Real-Time ATP rate assay
- Cell Characterization: The XFp Analyzer and the Seahorse XF Real-Time ATP rate assay
- Cell Characterization: The XF HS Mini Analyzer and the XF Real‐Time ATP Rate Assay
- Cell Characterization: The XF HS Mini Analyzer with the HS Miniplate and the XF Real-Time ATP Rate Assay
Reference Material
- Agilent Seahorse Assay Guides and Templates
- Agilent Seahorse Assay Guides and Templates
- Agilent Seahorse Assay Guides and Templates
- Agilent Seahorse Assay Guides and Templates
- Agilent Seahorse Assay Guides and Templates
- Agilent Seahorse Templates
- Agilent Cell Analysis Publication Database
Browse the full list of publications using Agilent Cell Analysis data.
3.4 Load Injection Solutions
3.5 Load Injection Solutions
If performing initial cell characterization (Cell Density Assay) using the Seahorse XF Real-Time ATP rate assay, follow the instructions and table below to load the cartridge injection ports.
If performing initial cell characterization (Cell Density and FCCP Concentration Titration Assay) using the Cell Energy Phenotype Assay, follow the instructions and table below to load the cartridge injection ports.
Note that for these assay designs, only the A and B injection ports will be used.
Sensor Cartridge Injection Port Layout
- Remove the hydrated cartridge from the non-CO2 incubator.
- Orient the Agilent Seahorse XF Assay Cartridge. Place row labels (lettered A-H) to the left. The triangular notch will be in the bottom left-hand corner.
- Orient the Agilent Seahorse XF Assay Cartridge. Place row labels (lettered A-D) to the left. The triangular notch will be in the bottom left-hand corner.
- Orient the Agilent Seahorse XFp Assay Cartridge. Place well labels (lettered A-H) to the left. The triangular notch will be in the bottom left-hand corner.
- Using a 100 or 200 μL (multichannel) pipette, make sure the tip(s) are securely fitted onto the pipette. Position the pipette tip(s) (filled with your compounds for injection) into the desired port, and orient the tips at a very slight angle ( <5°). Do not force the tips completely into the holes.


- Place the A/D loading guide flat on top of the assay cartridge. Orient the loading guide so the letter 'A' is located in the upper left-hand corner. Use your fingertips to hold the outside edges of the loading guide to stabilize during loading so pipette tips do not dislodge the loading guide.
- Using a 10-100 μL multichannel pipette, make sure the tips are securely fitted onto the pipette. Position the pipette tips (filled with your compounds for injection) into the desired column in the loading guide, and orient the tips at a very slight angle. Insert the tips as far as they will go without resistance into the holes and dispense the compound. Do not force the tips completely into the holes.
- Hold the tips at a 45° angle. Place the tips halfway into the injection ports with the bevel of the tip against the opposite wall of the injection port.
- Do NOT insert the tips completely to the bottom of the injection ports as this may cause compound leakage through the port.
- Gently dispense 20 μL of the appropriate injection solution into the ports according to plate/group layouts shown below. Withdraw the tips from the ports carefully stabilizing the loading guide throughout the procedure. Avoid creating air bubbles. Do not tap any portion of the cartridge in an attempt to alleviate air bubbles. This may cause solutions to leak from the injection port.
- Gently dispense 55 μL of the appropriate injection solution into the ports according to plate/group layouts shown below, depending on which assay is being performed. Withdraw the tips from the ports carefully. Avoid creating air bubbles, but do not tap any portion of the cartridge in an attempt to alleviate air bubbles. This may cause solutions to leak from the injection port.
- Gently dispense 20 μL of the appropriate injection solution into the ports according to plate/group layout shown below. Withdraw the tip(s) from the ports carefully, stabilizing the cartridge throughout the procedure. Avoid creating air bubbles. Do not tap any portion of the cartridge in an attempt to alleviate air bubbles. This may cause solutions to leak from the injection port.
- Remove the A/D port loading guide, and replace with the B/C port loading guide, with the ‘B’ in the upper left corner. Repeat steps above to load port B, using 22 µl of injection solution.
- Repeat steps above to load port B, using 62 µl of injection solution.
- Repeat steps above to load port B, using 22 µl of injection solution.
- Visually inspect the injection ports for even loading. The liquid should be in the port, make sure there are no residual drops on top of the cartridge.
Injection Port Loading for Cell Density Titration Assay
| Injection Ports and volumes for XF Real Time ATP Rate Assay Kit - Cell Characterization | ||||
|---|---|---|---|---|
| Port & Compound | Volume | 10X [Port] | [Final Well] | |
| Port A Oligomycin | 20 µl | 55 µl | 15 µM | 1.5 µM |
| Port B Rotenone + Antimycin A | 22 µl | 62 µl | 5 µM | 0.5 µM |
| Final concentration in well (μM) | FCCP Group | Wells | Port/Volume (μL) |
|---|---|---|---|
| Oligo / FCCP 1.0 / 1.0 | 1.0 μM | A1-D6 (all) | A / 55 |
Injection Port Loading for FCCP Concentration Titration Assay
If performing a different type of XF assay, consult the appropriate XF Kit User Guide and the instructions below for appropriate loading methods for more than one injection solution.
- Orient the Agilent Seahorse XF Assay Cartridge. Place row labels (lettered A-H) to the left. The triangular notch will be in the bottom left-hand corner.
- Orient the Agilent Seahorse XF Assay Cartridge. Place row labels (lettered A-D) to the left. The triangular notch will be in the bottom left-hand corner.
- Orient the Agilent Seahorse XF Assay Cartridge. Place row labels (lettered A-D) to the left. The triangular notch will be in the bottom left-hand corner.
- Place the A/D loading guide flat on top of the assay cartridge. Orient the loading guide so the letter 'A' is located in the upper left-hand corner. Use your fingertips to hold the outside edges of the loading guide to stabilize during loading so pipette tips do not dislodge the loading guide.
- Using a 10-100μl multichannel pipette, make sure the tips are securely fitted onto the pipette. Position the pipette tips (filled with your compounds for injection) into the desired column in the loading guide, and orient the tips at a very slight angle. Insert the tips as far as they will go without resistance into the holes and dispense the compound. Do not force the tips completely into the holes.
- Using a multichannel pipette, make sure the tips are securely fitted onto the pipette. Position the pipette tips (filled with your compounds for injection) at a 45° angle. Place the tips halfway into the injection ports with the bevel of the tip against the opposite wall of the injection port.
- Do NOT insert the tips completely to the bottom of the injection ports as this may cause compound leakage through the port.
- Dispense the compounds into the ports gently. Withdraw the tips from the ports carefully , stabilizing the loading guide throughout the procedure .


- Dispense the compounds into the ports gently. Withdraw the tips from the ports carefully , stabilizing the loading guide throughout the procedure .
- Avoid creating air bubbles, but do not tap any portion of the cartridge in an attempt to alleviate air bubbles. This may cause compound leakage from the injection port.
- Switch to the B/C loading guide. Orient with the letter 'B' in the upper left-hand corner. Repeat loading procedure outlined in steps 3-5 for 'B', 'C' and 'D' injection ports, using the appropriate loading guides. Remove and discard loading guide(s).
- Repeat loading procedure outlined in steps above for 'B', 'C' and 'D' injection ports.
- Visually inspect the injection ports for even loading. The liquid should be in the port, make sure there are no residual drops on top of the cartridge.
General Information and Guidelines for Injections
- The recommended injection volume is 20-30 μL.
- The recommended injection volume is 50-100 μL.
- Recommended Injection Solution Volumes for 10X dilution upon injection, starting with a microplate well volume of 180 μL assay medium:
- Port A: 20 μL
- Port B: 22 μL
- Port C: 25 μL
- Port D: 28 μL
- Port A: 55 μL
- Port B: 62 μL
- Port C: 69 μL
- Port D: 75 μL
Related Support Material
- Loading the Agilent Seahorse XFe96 Sensor Cartridge Injection Ports
- Loading the Agilent Seahorse XFe24 Sensor Cartridge Injection Ports
- Loading the Agilent Seahorse XF24 Sensor Cartridge Injection Ports
- Loading the Agilent Seahorse XFp Sensor Cartridge Injection Ports
- Cell Characterization: The XFe96/XF96 Analyzer and the Seahorse XF Real-Time ATP rate assay
- Cell Characterization: The XFe24 Analyzer and the Seahorse XF Real-Time ATP rate assay
- XF24 Cell Characterization: The XF24 Analyzer and the Cell Energy Phenotype Test
- Cell Characterization: The XFp Analyzer and the Seahorse XFp Real-Time ATP rate assay
- Cell Characterization: The XF HS Mini Analyzer and the XF Real‐Time ATP Rate Assay
- Cell Characterization: The XF HS Mini Analyzer with the HS Miniplate and the XF Real-Time ATP Rate Assay
Reference Material
- Agilent Seahorse Assay Guides and Templates
- Agilent Seahorse Assay Guides and Templates
- Agilent Seahorse Assay Guides and Templates
- Agilent Seahorse Assay Guides and Templates
- Agilent Seahorse Assay Guides and Templates
- Agilent Seahorse Templates
- Agilent Cell Analysis Publication Database
Browse the full list of publications using Agilent Cell Analysis data.